

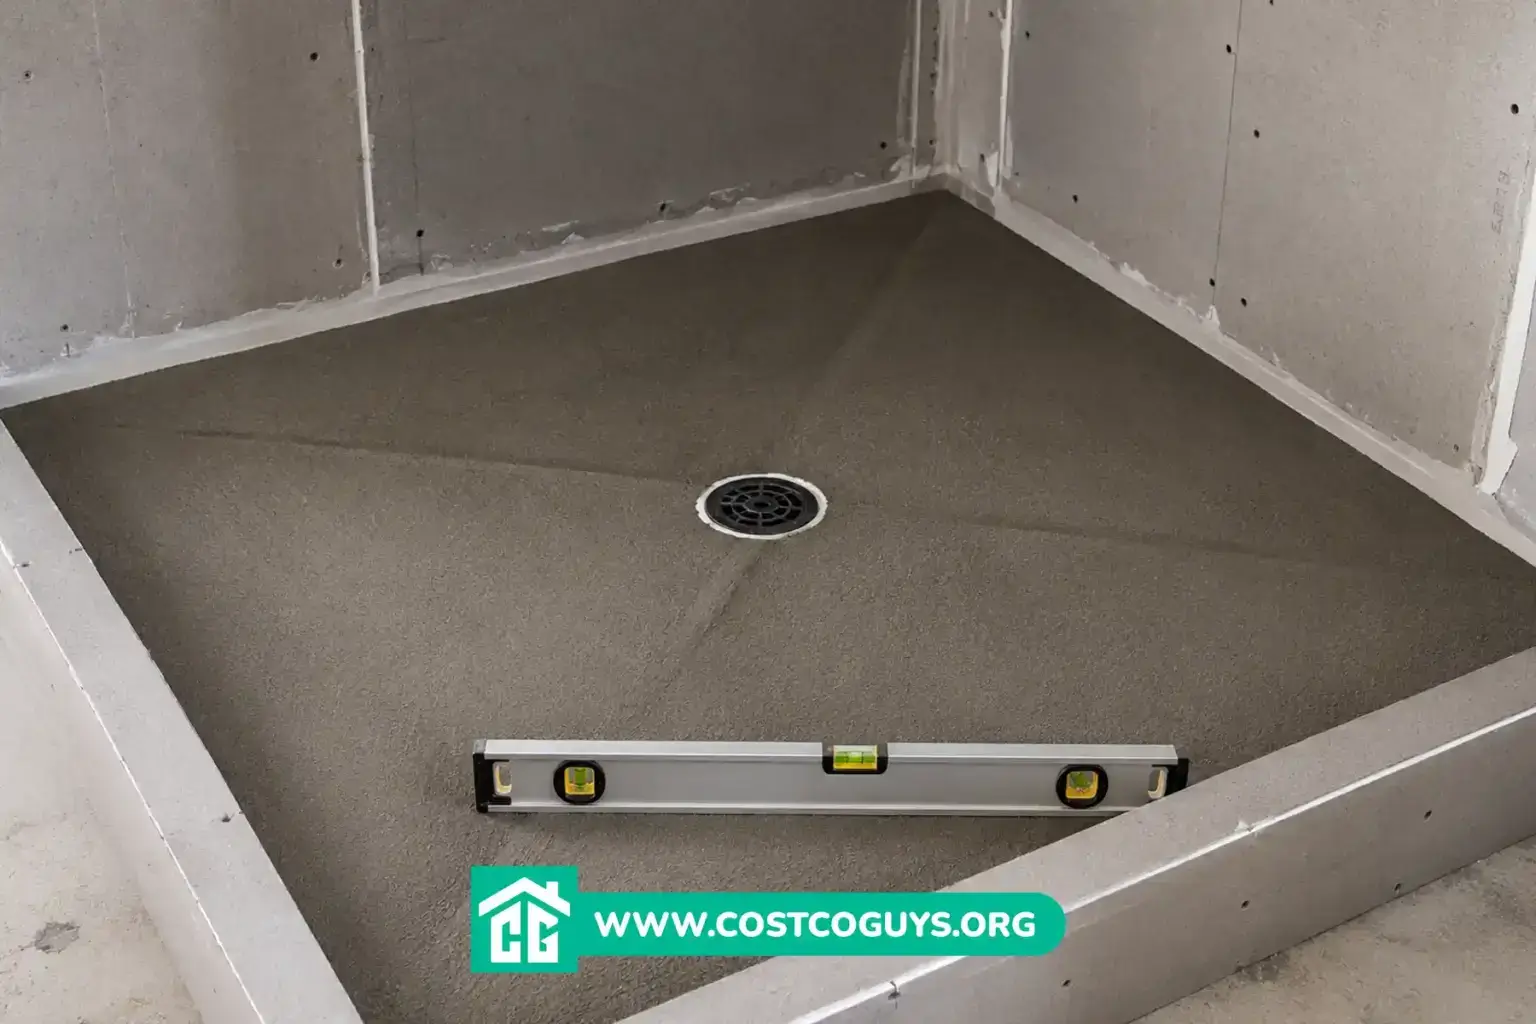

A shower pan pre slope is the sloped mortar layer that sits under the waterproofing membrane, and it’s the part of a tile shower that decides whether the whole thing lasts ten years or gets torn out in two. Skip it, and a tiled shower floor traps water against the subfloor within a year or two.
- Why Every Shower Pan Needs a Pre Slope
- Materials for a Dry Pack Pre Slope Mortar Bed
- Step by Step: Building the Pre Slope Mortar Bed
- Setting the Correct Slope Per Foot and Drain Height
- Adding the Shower Pan Liner Over the Pre Slope
- Common Pre Slope Mistakes That Cause Leaks
- Pre Slope Mortar vs Prefabricated Sloped Shower Pans
- Shower Pan Installation Cost Breakdown for 2026
- How These Shower Pan Pre Slope Costs Were Calculated
- When to Call a Professional Tile Installer
- Getting Your Shower Pan Pre Slope Right the First Time
- Shower Pan Pre Slope: Frequently Asked Questions
Why Every Shower Pan Needs a Pre Slope
A standard shower floor has two sloped layers, not one. The pre slope sits directly on the subfloor and tilts toward the drain. A waterproofing liner (usually PVC, CPE, or a sheet membrane like Kerdi) sits on top of that pre slope. Then a second mortar layer, the final mud bed, goes over the liner and gets tiled.
Here’s the part people miss: tile and grout are not waterproof. Water works its way through grout lines and through the tile itself over time. That water lands on the liner, not on the tile surface. If the liner sits flat on the subfloor instead of sloped toward the drain, that water just pools under your shower floor with nowhere to go.
Standing water under a shower floor causes mold, wood rot in the subfloor, and eventually a soft, sagging shower pan. A proper pre slope gives that trapped water a path out through small weep holes in the drain, so it never has a chance to sit still.
Materials for a Dry Pack Pre Slope Mortar Bed
You’ll need a dry-pack mortar mix, a two-piece drain assembly (sometimes called a clamping drain), 15 pound roofing felt or 6 mil plastic as a bond break, a screed board, a level, and a margin trowel. Most pros also use a slope guide kit, which is a set of adjustable posts that mark your target height at several points around the shower.
For the mortar itself, trade sources don’t fully agree on ratio. Some tile setters mix five parts sand to one part Portland cement for a drier, more workable pack. Others prefer a stiffer three-to-one ratio for extra compressive strength on a mortar bed installation. Either works if the mix holds its shape when you squeeze a handful into a ball. If you’d rather skip the guesswork, a pre-blended bag like Sakrete Sand Mix or Custom Building Products Mortar Mix gives you a consistent ratio every time.

Related reading on Costco Guys: if you haven’t picked a waterproofing method yet, a separate article comparing PVC shower pan liners against sheet membrane systems would help you choose before you buy materials.
Step by Step: Building the Pre Slope Mortar Bed
Start by dry-fitting the drain assembly and confirming the subfloor can support the weight of a mortar shower pan. Then follow this process:
- Lay your bond break material (felt paper or plastic) over the subfloor so the pre slope mortar doesn’t bond directly to the wood.
- Set the lower drain flange at the height specified by your drain manufacturer, usually about a half inch above the subfloor.
- Mark your high point on the shower walls using the slope calculation in the next section.
- Mix your dry pack mortar to a “wet sand” consistency, firm enough to hold a shape but not soupy.
- Pack the mortar into the shower base, working from the drain outward, and screed it against your height marks.
- Float the surface smooth with a wood or magnesium float, checking slope with a level as you go.
- Let the pre slope cure for 24 to 48 hours before installing the liner.
Work in sections if your shower floor is large. Packing the whole base in one pass makes it hard to keep the slope even, especially around curves or a bench.
Setting the Correct Slope Per Foot and Drain Height
Model building codes call for a shower floor slope between 1/4 inch and 1/2 inch per foot, with 1/4 inch per foot as the standard most inspectors expect. That means a wall three feet from the drain needs to sit about 3/4 inch higher than the drain flange, not counting the initial half inch drain height.
Here’s the math in plain terms: measure the distance from the drain to each wall in feet, multiply by 0.25, then add the drain’s starting height above the subfloor. A wall four feet away needs one inch of rise, plus the half inch drain height, for a total of 1.5 inches at that wall.
Mark that height at several points around the perimeter, snap a line between them, and use that line as your screed guide. A shower floor with an irregular shape, like an L-shaped layout around a bench, needs extra marks at every direction change so the slope stays consistent instead of pooling in a corner.
Adding the Shower Pan Liner Over the Pre Slope
Once the pre slope cures, cut your liner material to size and run it up the walls at least 6 inches, though your local code may require more. Fold corners instead of cutting them, since a cut corner creates a seam where water can get through.
Cut an X directly over the drain, pull the liner through, and clamp it to the lower drain flange with the manufacturer’s clamping ring. Don’t glue or caulk the liner to the pre slope mortar itself. The liner needs to float freely over that first layer so it can flex without tearing.
Test the liner before you go further. Plug the drain’s weep holes with a rag, fill the pan with about two inches of water, and let it sit overnight. If the water level holds, you’re clear to build the final mud bed and tile over it.
Common Pre Slope Mistakes That Cause Leaks
The most common mistake is skipping the pre slope entirely and setting the liner flat on the subfloor. This shows up years later as a soft spot in the floor or a moldy smell that won’t go away, long after the tile looks fine on the surface.
A second mistake is bonding the pre slope directly to a wood subfloor without a bond break layer. Mortar and wood expand and contract at different rates, and without that separation layer, the pre slope cracks as the subfloor moves.
Rushing the cure time ranks high too. Tiling or setting the liner before the pre slope firms up lets the mortar shift underfoot, which throws off your slope and can crack the finished floor down the line. Give it the full 24 to 48 hours before moving forward.
Pre Slope Mortar vs Prefabricated Sloped Shower Pans
A traditional mortar pre slope isn’t the only path to a sloped shower floor anymore. Foam pan systems, like the Schluter Kerdi-Shower tray or similar prefabricated pre-sloped underlayment panels, come pre-formed at the correct pitch and skip the mortar step altogether.
A prefabricated sloped tray costs more upfront per square foot than raw mortar and sand, but it saves labor time and removes the risk of an uneven hand-packed slope. A traditional mortar pre slope costs less in materials and gives you more flexibility for oddly shaped showers, curbless entries, or custom drain placement, but it takes more skill and more time to get the slope right. For a straightforward rectangular shower, a prefab tray is often the easier call for a first-time DIYer. For a custom curbless shower or an irregular layout, dry-pack mortar still gives you more control.
Shower Pan Installation Cost Breakdown for 2026
| Item or Service | Typical Cost Range (2026) | What Affects the Price |
|---|---|---|
| DIY dry-pack pre slope, materials only | $40 to $120 | Bag mix versus loose sand and cement, drain flange type |
| Professional mortar bed installation (labor and materials) | Roughly $9.67 to $11.66 per square foot | Local labor rates, shower floor size, subfloor prep needed |
| Prefabricated sloped foam pan (Schluter Kerdi tray or similar) | $200 to $550 for the pan alone | Pan size, center versus off-center drain position |
| Full custom tile shower pan, pre slope through finished tile | $900 to $3,500 installed | Tile choice, linear versus point drain, shower footprint |
| Linear drain upgrade | Add $150 to $400 to labor | Single-plane slope calculation takes more setup time |
These figures reflect national averages, and your actual bid will move with your region and the shower’s exact size. That’s the one caveat worth stating plainly: get a written quote before committing to a professional install, since a tile setter needs to see your subfloor and drain location first.
How These Shower Pan Pre Slope Costs Were Calculated
The mortar bed labor and material figure comes from current 2026 unit cost data for installed mortar bed square footage, which already factors in typical labor rates and material markup. The custom tile shower pan range reflects a full project, not just the pre slope, since most homeowners pricing this job want the complete picture from subfloor to finished tile.
Prefab pan pricing comes from current retail listings for common sizes, since those products carry a fixed shelf price rather than a labor-based estimate. None of these numbers account for permit fees, which some jurisdictions require for a full shower pan replacement, or for unexpected subfloor repairs found once the old pan comes out. Treat every range here as a planning estimate, not a guaranteed quote for your specific bathroom.
When to Call a Professional Tile Installer
Call a pro if your shower has a curbless entry, a linear drain, or a custom shape with more than four walls, since the slope math gets harder to keep consistent across multiple planes. A licensed plumber should also handle any drain relocation, since moving a drain line usually means cutting into the subfloor and possibly the joists below.
If you’ve never worked with dry-pack mortar before, consider a prefabricated sloped pan for your first shower project. It removes the slope calculation entirely and still gives you a code-compliant pre slope, just at a higher material cost than raw sand and cement.
Getting Your Shower Pan Pre Slope Right the First Time
A shower pan pre slope only has one job: move water toward the drain instead of letting it sit against your subfloor. Hit the 1/4 inch per foot slope, use a bond break layer under the mortar, and let the mud cure fully before you touch it again, and the rest of the shower build gets a lot more forgiving. Whether you dry-pack a traditional mortar bed or install a prefab sloped tray, that slope is the one detail this whole project depends on.
Shower Pan Pre Slope: Frequently Asked Questions
How thick should a shower pan pre slope be?
A pre slope typically ranges from about 1/2 inch at the drain to 1 to 2 inches at the walls, depending on how far each wall sits from the drain. The exact thickness at any point comes from the 1/4 inch per foot slope calculation, not a fixed number.
Can you skip the pre slope and just slope the final mud bed?
No. Skipping the pre slope leaves the waterproofing liner flat on the subfloor, which traps any water that gets past the tile and grout. Both mortar layers need their own slope toward the drain for the system to work.
How long does a shower pan pre slope need to cure?
Most tile setters wait 24 to 48 hours before installing the liner over a fresh pre slope. Full mortar strength takes longer, but the pre slope only needs enough surface hardness to support the liner without shifting.
What’s the difference between a pre slope and a shower pan liner?
The pre slope is a sloped mortar layer that sits directly on the subfloor. The liner is a waterproof membrane, often PVC or CPE, that sits on top of the pre slope and catches any water that seeps through the tile above it.
Do prefabricated shower pans still need a pre slope?
No, prefabricated sloped pans like a Schluter Kerdi tray come pre-formed with the correct slope built in, so you skip the mortar pre slope step entirely. You still need to waterproof and tile over the prefab pan itself.
