

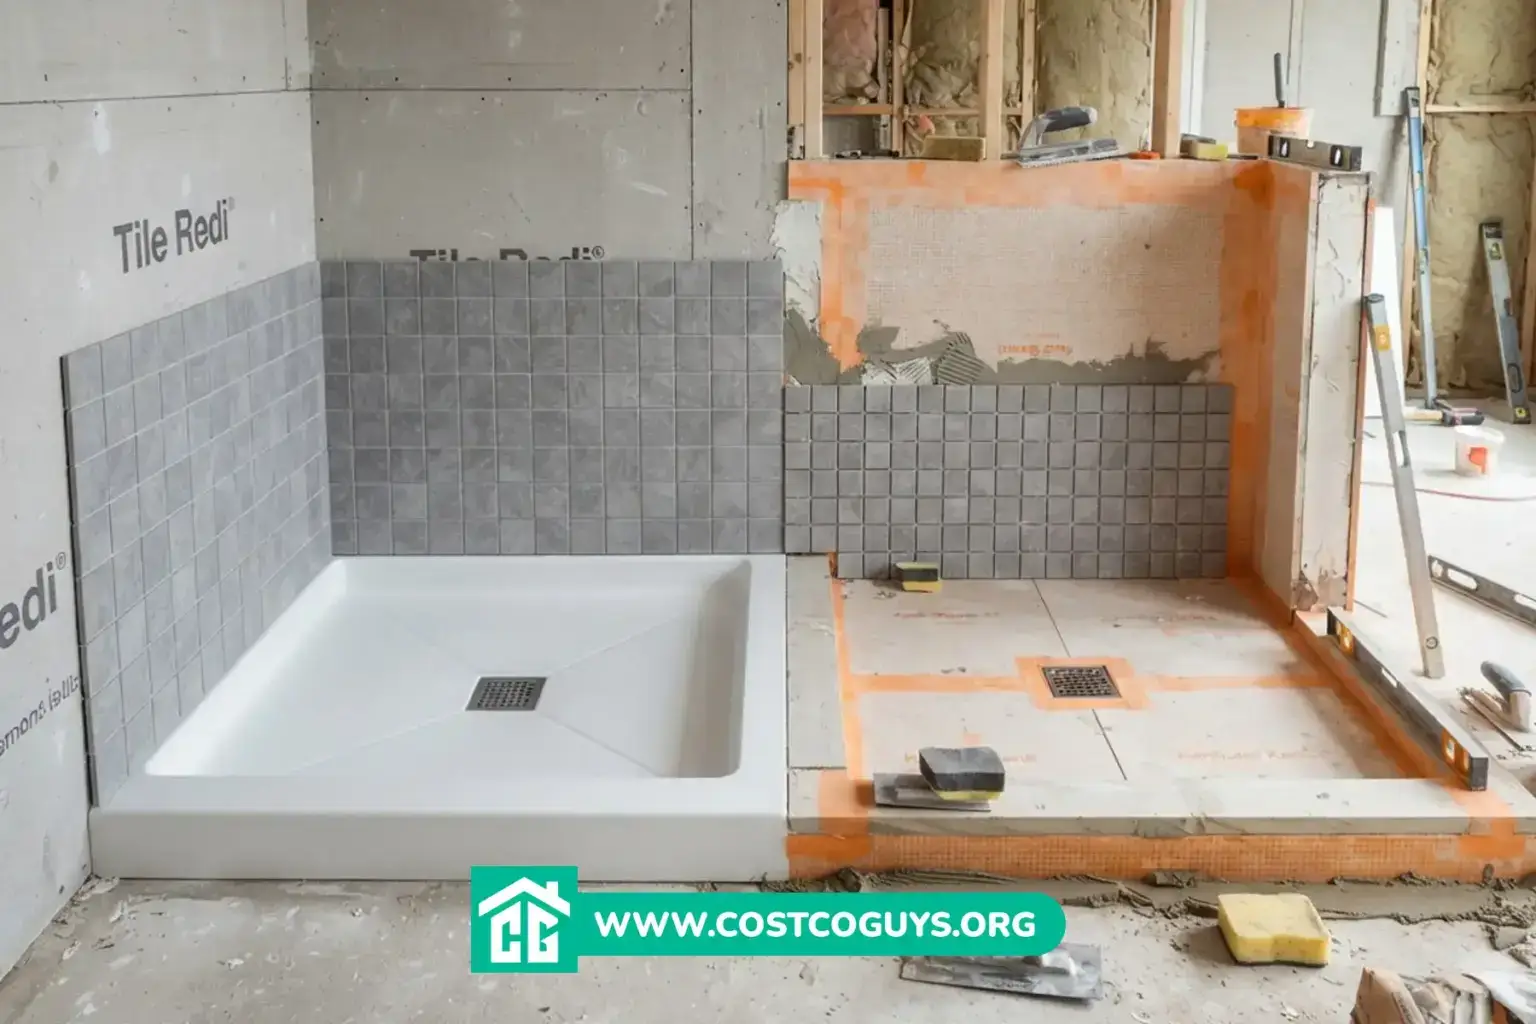

Tile shower pan kits give you a pre-sloped, waterproof base that’s ready to tile. You skip the traditional mortar bed entirely. Expect to pay roughly $150 to $600 or more, depending on size, material, and drain style.
- What’s Included in a Ready to Tile Shower Pan Kit
- Tile Redi vs Schluter Kerdi Shower Pan Kits
- Tile Shower Pan Kit Prices in 2026
- How These Shower Pan Kit Prices Were Estimated
- Choosing the Right Size and Drain Position
- Installing a Tile Shower Pan Kit
- Common Mistakes That Lead to Leaks
- DIY vs Hiring a Pro for Shower Pan Installation
- Picking the Right Tile Shower Pan Kit
- Frequently Asked Questions
These kits have become the standard choice for DIY tile showers because they cut out a lot of guesswork. Instead of hand-pitching a mortar bed to the drain, you set a factory-sloped shower base or foam substrate. Then you add a waterproofing membrane and start tiling. The result is a more consistent slope and fewer chances for a leak to slip past you.
What’s Included in a Ready to Tile Shower Pan Kit
Most tile shower pan kits include a shower base or tray, a drain assembly, and some form of waterproofing. The exact parts depend on the system. A one-piece PVC or ABS pan already has the slope built in, so the tile goes straight onto the surface. A foam-board system uses lightweight EPS panels that you cut to fit and bond together. You then cover the panels with a waterproofing membrane.
Drains typically use a PVC bonding flange that seals to the pan and connects to the drain pipe below. Some kits pair with a square strainer. Others use a linear drain that runs along one side for a more modern look. Curbs, corner seals, and pipe boots usually come with the kit or as a matched add-on. That way, the whole system bonds together instead of relying on separate caulk joints.
Tile Redi vs Schluter Kerdi Shower Pan Kits
The two names you’ll see most often are Tile Redi and Schluter Kerdi. Each brand solves the waterproofing problem in a different way. Tile Redi makes a single molded pan, with the curb, slope, and drain flange built into one piece at the factory. That design reduces the number of seams where water could eventually find a path through.
Schluter’s Kerdi system uses separate foam shower tray and curb pieces. You join them with a waterproofing membrane and sealing strips at every seam. It’s a flexible approach that lets you build custom shapes and sizes. That flexibility depends on every seam being taped and bonded correctly during installation. Both systems are widely used, and both can perform well when installed by the book. The choice usually comes down to whether you want a fixed factory shape or a custom-built layout.

Tile Shower Pan Kit Prices in 2026
Reliable, verified 2026 pricing wasn’t available from a live source check for this article. Treat the figures below as a general planning range rather than a specific quote. Retailer listings for shower pan kits commonly fall into a few price bands based on size and brand.
| Kit Type | Typical Price Range | What Affects the Price |
|---|---|---|
| Basic PVC/foam pan, single curb, center or side drain | $150 to $300 | Standard 32 to 36 inch square sizes cost less than custom shapes |
| Foam-board system (tray, curb, membrane, strips) | $250 to $450 | Larger trays and steam-shower-rated kits push the price up |
| Kit with linear drain and adjustable grate | $350 to $600+ | Linear drains and stainless grates cost more than a standard round strainer |
| Barrier-free (curbless) shower pan kit | $400 to $700+ | Larger footprint and extra floor prep add to the cost |
How These Shower Pan Kit Prices Were Estimated
These ranges come from comparing publicly listed retail prices for major shower pan kit brands. The retailers sell through home improvement stores and plumbing supply outlets. Size is the biggest cost driver. A 30 inch square pan costs less than a 60 inch pan built for a large walk-in shower. Drain style matters too, since a linear drain with an adjustable grate costs more than a basic round strainer.
None of these figures account for tile, thinset, grout, or labor if you hire a pro. Treat this table as editorial guidance for budgeting, not a guaranteed local price. Local suppliers and current promotions can shift the number in either direction.
Choosing the Right Size and Drain Position
Shower pan kits come in standard sizes like 32×32, 36×36, and 32×60 inches. Custom dimensions are also available for larger walk-in showers. Measure your rough opening before you shop. A pan that’s even an inch too big won’t fit, and one that’s too small leaves an awkward gap at the walls.
Drain position matters just as much as size. Kits are sold with the drain on the left, right, or center of the pan. That position needs to match where your existing drain pipe comes up through the floor. If your plumbing doesn’t match a standard position, look for a kit with an adjustable or off-center flange. Otherwise, plan on moving the drain pipe before you set the pan.
Installing a Tile Shower Pan Kit
The general process is similar across most kits, though you should always follow the manufacturer’s specific instructions for your product. Dry-fit the pan first to confirm it clears the drain pipe and framing correctly.
- Dry-fit the shower base or foam tray over the drain to check alignment and height.
- Cut the drain pipe to the height specified by the kit instructions.
- Set the pan in a bed of thinset mortar or the recommended bonding material.
- Install the drain flange and bonding collar, following the manufacturer’s sealing steps.
- Apply the waterproofing membrane or strips over all seams, curbs, and wall transitions.
- Let everything cure per the product’s instructions before starting the tile.
A shower pan liner test, sometimes called a flood test, is worth doing before you tile. You plug the drain and fill the pan with a shallow layer of water. Then you check for leaks over a set period. It’s a simple step that can save you from finding a leak after the tile and grout are already in.
Common Mistakes That Lead to Leaks
Rushing the waterproofing membrane is the mistake that shows up most often. Skipping a flood test is another common shortcut. So is cutting corners on seam sealing or not letting mortar cure long enough before tiling. These shortcuts are the usual culprits behind a shower that leaks months after installation.
Another common issue is buying a pan sized for the framed opening instead of the finished tile opening. Tile and backer board add thickness at the walls. A pan that fits the bare studs perfectly can end up too tight once the wall surface goes in. Dry-fitting before you cut anything catches this early.
DIY vs Hiring a Pro for Shower Pan Installation
An intermediate DIYer comfortable with tile and basic plumbing can usually install a ready to tile shower pan kit. The trickiest part is usually the drain connection and getting the waterproofing membrane sealed correctly at every seam and corner.
Call a licensed plumber if the project involves moving the drain location. The same goes for adjusting the P-trap, the curved pipe under the drain that holds water and blocks sewer gas. Also call a pro if you find soft or rotted subfloor once you open up the area. Local permit rules can require an inspection for drain work. Check with your local building department, sometimes called the authority having jurisdiction, before you start.
Picking the Right Tile Shower Pan Kit
The right tile shower pan kit comes down to three things. First, the exact size of your shower opening. Second, where your drain sits. Third, whether you want a one-piece pan or a custom foam-board build. A one-piece pan like Tile Redi gets you fewer seams and a faster install. A foam system like Schluter Kerdi gives you more flexibility for custom shapes and steam showers.
Measure your space carefully and match the drain position to your existing plumbing. Don’t skip the flood test before you tile. That combination is what separates a shower pan installation that lasts for decades. Skip it, and you risk a shower that leaks within the first year.
Frequently Asked Questions
Can I install a tile shower pan kit myself?
Yes, most kits are designed for DIY installation if you have basic tile and plumbing experience. The main challenge is sealing the waterproofing membrane correctly at every seam. Read the manufacturer’s instructions closely before you start.
Do I need a permit to replace a shower pan?
It depends on your local building department. Simple pan replacement that reuses the existing drain location often doesn’t need a permit. Moving a drain or altering plumbing usually does, so check with your local authority having jurisdiction first.
What’s the difference between a shower pan and a shower base?
The terms are often used interchangeably. “Shower base” sometimes refers to a finished, non-tiled acrylic unit. “Shower pan” more often describes the tile-ready substrate that sits underneath your finished tile surface.
How long does a tile shower pan kit take to install?
Setting the pan, drain, and waterproofing usually takes a full day for an experienced DIYer, not counting cure time. Add another day or two if you’re also tiling the walls and floor.
Can I use a linear drain with any tile shower pan kit?
No, linear drains require a pan or foam substrate built with a slope toward one side rather than a center point. Check that the kit is designed for linear drainage before you buy. A center-drain pan won’t work with a linear grate.
