
A waterproof shower pan costs between $900 and $3,500 to install in 2026, with most homeowners landing around $1,600 to $2,900 depending on the waterproofing method and pan size. The price swings on whether you go with a sheet membrane system, a liquid-applied membrane, or a hot mop pan, and whether a pro handles the job or you do it yourself.
- What Actually Makes a Shower Pan Waterproof
- Sheet Membrane vs Liquid Membrane Systems
- Step-by-Step: Waterproofing a Shower Floor
- Shower Pan Waterproofing Cost Breakdown
- How These Shower Pan Estimates Were Calculated
- Common Mistakes That Cause Shower Leaks
- When to Call a Professional Instead of DIY
- Preformed Shower Pans vs Custom Tile Pans
- Getting a Waterproof Shower Pan That Lasts
- Frequently Asked Questions
What Actually Makes a Shower Pan Waterproof
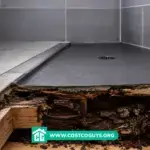
A shower pan is the sloped floor under your shower that channels water to the drain. On its own, a mortar bed or foam pan isn’t waterproof. It needs a waterproof membrane, either a sheet product or a liquid coating, bonded over the entire surface before tile goes down.
The membrane is the part doing the real work. Tile and grout look solid, but grout is porous and lets water pass through over time. Without a continuous waterproof layer underneath, that moisture reaches your subfloor (the wood or concrete layer beneath the shower) and causes rot, mold, or a leak into the room below.
Every part of the shower pan waterproofing system has to connect without gaps: the floor, the walls a few inches up, the curb, and the drain assembly. Miss one seam and you’ve built a weak point that water will eventually find.
Sheet Membrane vs Liquid Membrane Systems
Sheet membranes, like Schluter-KERDI, are thin polyethylene sheets with fleece on both sides. The fleece bonds into thin-set mortar, and seams get taped with matching band material. Because the sheet comes at a fixed thickness from the factory, you don’t have to guess whether you’ve applied enough material.
Liquid membranes, like RedGard or Laticrete Hydro Ban, go on with a roller or trowel in two coats over cement board. They conform to odd shapes and curved corners without cutting or seaming, which makes them useful for irregular showers. The tradeoff is that thickness depends entirely on the person applying it. Both products meet ANSI A118.10, the industry standard for bonded waterproof membranes under tile, when applied correctly.

Sheet systems tend to run higher on material cost because of the drain, band, and corner pieces, but many tile setters find them faster once you know the process. Liquid membranes cost less upfront and work well for DIY tub-to-shower conversions, though they demand more patience with dry time between coats.
Step-by-Step: Waterproofing a Shower Floor
Here’s the general sequence a tile installer follows to waterproof a shower pan, whether using a sheet or liquid system.
- Confirm the subfloor is solid, level, and rated to carry a mortar bed. Replace any soft or water-damaged wood first.
- Install the drain assembly and connect it to the plumbing system below, including the flange (the flat ring that seals the drain to the pan).
- Pour and slope a mortar bed toward the drain, typically a quarter inch of drop per foot.
- Apply the waterproof membrane across the entire shower floor, extending it up the walls at least six to eight inches and fully covering the curb.
- Seal every seam, inside and outside corners, and pipe penetration with band material or extra coats of liquid membrane.
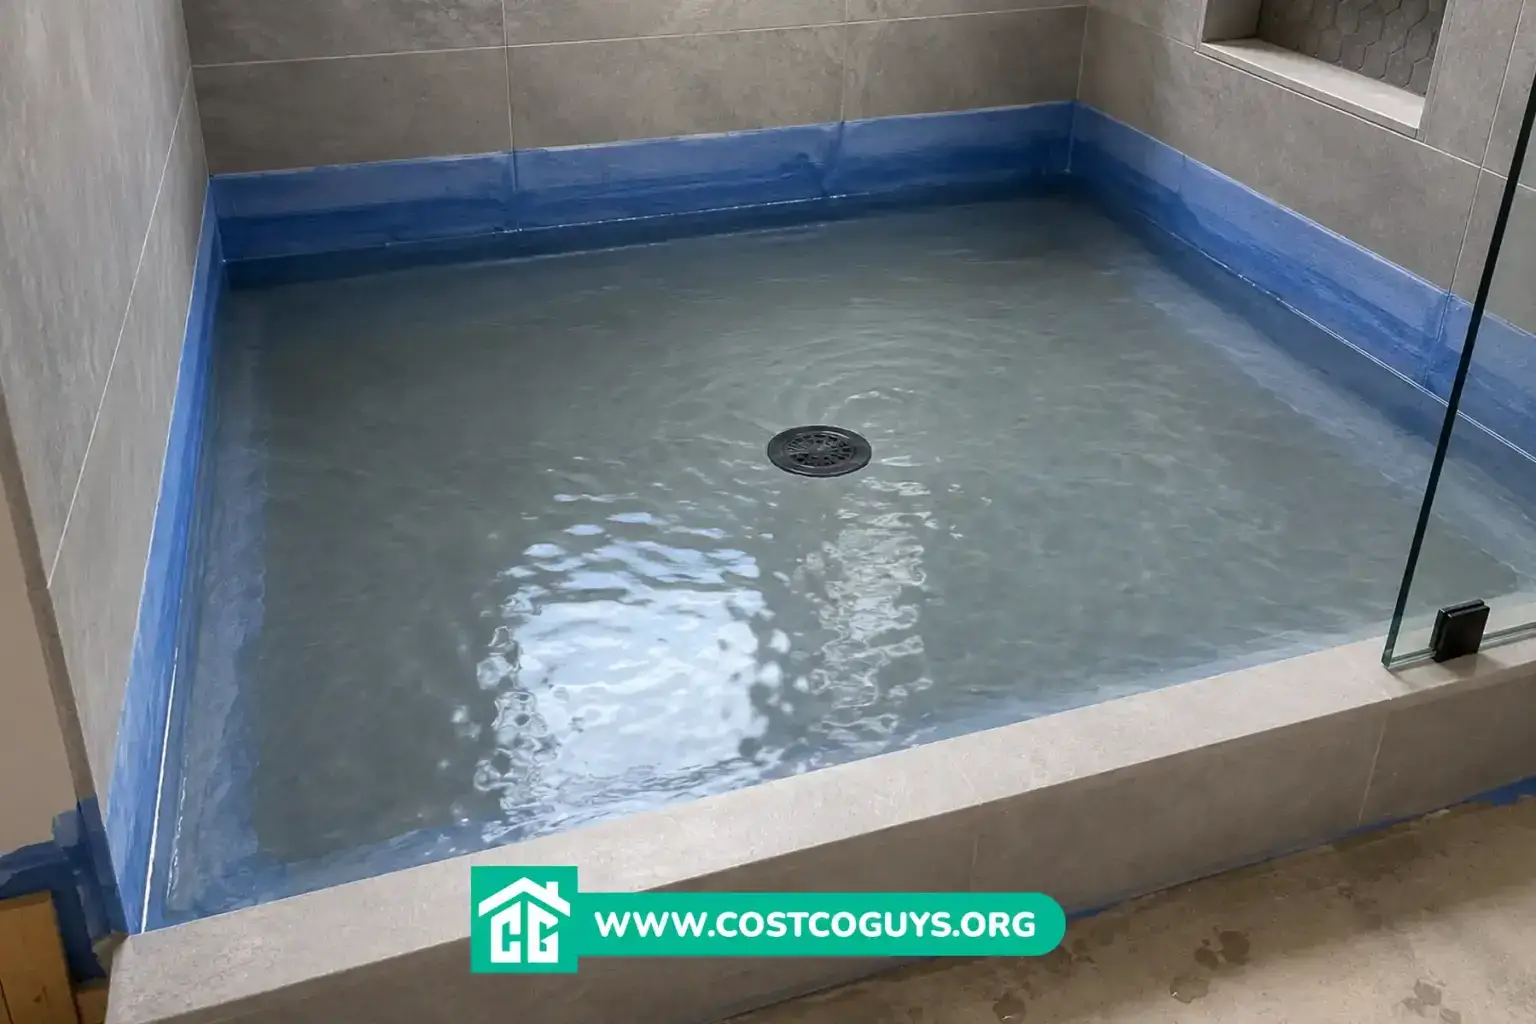
- Run a flood test. Plug the drain, fill the pan with water, and let it sit for 24 hours to check for leaks before tiling.
- Once the membrane passes the flood test, set your tile and grout.
Skipping the flood test is one of the most common shortcuts on rushed jobs. It’s the only way to catch a leak before it’s buried under tile.
Shower Pan Waterproofing Cost Breakdown
Costs vary by pan size, membrane type, and whether you hire a professional. The table below breaks down typical ranges for 2026.
| Item or Service | Typical Cost Range | What Affects the Price |
|---|---|---|
| Liquid membrane (RedGard, Hydro Ban) | $75 to $150 per shower | Shower size, number of coats needed, substrate condition |
| Sheet membrane kit (Schluter-KERDI) | $400 to $650 per shower | Drain type, curb length, extra corners or niches |
| Hot mop shower pan | $225 to $500 | Layers of tar and felt, labor availability in your area |
| Poured mud shower pan | $350 to $650 | Pan size, mortar mix, whether tile is included |
| Professional labor (waterproofing and pan install) | $350 to $570 | Drain relocation, difficult access, existing pan removal |
| Full shower pan installation, materials and labor | $900 to $3,500 | Custom size, tile choice, plumbing changes |
A basic prefab pan with a liquid membrane sits at the low end. A custom tiled shower floor with a full sheet membrane system, especially one with a linear drain or unusual layout, pushes toward the top of that range.
How These Shower Pan Estimates Were Calculated
These figures come from comparing current 2026 pricing data from Angi, This Old House, and Homewyse against material costs at major retailers. Homewyse puts professional shower pan installation at $1,536 to $2,967, while Angi’s national average lands closer to $1,620 for pan replacement specifically, with a wider range of $530 to $4,600 once custom tile work is included.
The difference between those numbers comes down to scope. Angi’s lower figures often reflect prefab pan swaps, while Homewyse’s estimates assume a full custom mortar bed and membrane install performed by a licensed contractor. Neither number is wrong, they’re measuring different jobs.
This range reflects national averages and editorial judgment based on the sources above, not an audited quote for your specific bathroom. Labor rates, permit fees, and material costs shift by region, so treat this as a starting point for budgeting, not a guaranteed local price.
Common Mistakes That Cause Shower Leaks
The biggest mistake homeowners make is treating grout as the waterproof layer. Grout resists surface water, but it’s not a waterproof barrier on its own. Every tile shower needs a membrane underneath, full stop.
Another frequent error is skipping the wall-to-floor transition. Water runs down walls and pools at the base of the shower, so that inside corner needs extra membrane reinforcement, not just a bead of caulk. Rushing this step is a common reason showers leak within the first two or three years.
Using the wrong mortar with a sheet membrane also causes problems. Schluter, for example, specifies unmodified thin-set for bonding KERDI, since modified versions need to dry out to cure fully and can trap moisture against the membrane fleece. Mixing product lines from different manufacturers can void the warranty even when both products are individually rated for waterproofing.
When to Call a Professional Instead of DIY
A straightforward liquid membrane job over an existing cement board wall is realistic for an experienced DIYer. Moving a drain, however, involves cutting into the plumbing system and usually requires a permit and inspection, so that’s a job for a licensed plumber.
If your project involves a custom mortar bed, an oversized shower, or a steam shower with higher moisture demands, hire a professional tile installer familiar with your chosen membrane system. Steam showers need a membrane rated for continuous vapor exposure, and getting that wrong leads to expensive repairs down the road, not just a minor touch-up.
Cutting corners on shower pan waterproofing is one of the costliest mistakes in a bathroom remodel, since fixing a failed pan usually means tearing out the tile, walls, and sometimes the subfloor to get at the problem.
Preformed Shower Pans vs Custom Tile Pans
Preformed acrylic or fiberglass shower pans arrive already waterproof from the factory, so you skip the membrane and mortar bed steps entirely. They cost less in labor and go in fast, but they limit you to standard sizes and a plastic shower floor look that some homeowners want to avoid.
Custom tile pans, built with a mortar bed and separate waterproofing layer, cost more in labor and time but let you match the tile across the entire shower floor and walls. If your bathroom has an odd footprint or you’re set on a specific tile pattern, a custom pan is usually the only option that fits.
Getting a Waterproof Shower Pan That Lasts
A properly built waterproof shower pan combines a sloped mortar bed or preformed base, a membrane that meets ANSI A118.10, and sealed transitions at every corner, seam, and drain connection. Skip any one of those pieces and you’ve created a path for water to reach your subfloor.
Budget $900 to $3,500 for a full installation in 2026, with the final number driven mainly by pan size, membrane choice, and whether a professional handles the plumbing and tile work. Whether you choose a sheet system or a liquid membrane, the flood test before tiling is what actually confirms the shower pan is watertight, so don’t skip it to save a day on the schedule.
Frequently Asked Questions
Is RedGard alone enough to waterproof a shower pan?
RedGard meets ANSI A118.10 when applied at the correct thickness in two full coats, so it can work as a standalone membrane on a properly prepared substrate. The most common failure comes from applying it too thin, so check for full, even coverage before tiling.
How long does a waterproof shower pan last?
A correctly installed membrane, whether sheet or liquid, typically lasts as long as the tile itself, often 20 years or more. Hot mop pans have a documented track record of 15 years or longer when installed by an experienced contractor.
Can I waterproof a shower pan myself?
Yes, a liquid membrane system over cement board is manageable for an experienced DIYer comfortable with tile prep. Drain relocation or complex sheet membrane systems are better left to a professional, since mistakes there are expensive to fix after tile goes down.
What’s the difference between a shower pan and a shower base?
The terms often get used interchangeably, but technically the shower base is the structural layer beneath the pan, usually a sloped mortar bed. The shower pan is the finished waterproof surface, sometimes referred to as the shower pan liner when it’s a separate membrane component within that base.
Why did my new tile shower leak within a year?
Early leaks almost always trace back to incomplete membrane coverage, especially at inside corners, the curb, or the drain flange. A flood test before tiling catches this problem while it’s still fixable, which is why skipping that step is such a costly shortcut.