
Shower pan waterproofing is a layered barrier system that keeps water from reaching the subfloor, wall framing, and floor joists beneath a tile shower. Done right, it protects your home from rot, mold, and structural damage that can cost $5,000 to $15,000 or more to fix if a liner fails.
- What Shower Pan Waterproofing Actually Does
- The Three Main Shower Pan Waterproofing Systems
- Traditional PVC or CPE Pan Liner
- Sheet Membrane Systems (Schluter Kerdi)
- Liquid-Applied Waterproof Membranes
- Shower Pan Waterproofing: Step-by-Step for the PVC Liner Method
- Prepare the subfloor:
- Install the drain base:
- Pour the pre-slope mortar bed:
- Cut and lay the PVC liner:
- Install the curb liner pieces:
- Clamp the liner to the drain:
- Flood test the liner:
- Pour the top mortar bed:
- Install cement board on walls:
- Set tile using wet-area thin-set:
- Shower Waterproofing Cost Breakdown for 2026
- How These Cost Estimates Were Developed
- PVC Liner vs. Schluter Kerdi: Which One Makes Sense
- Common Shower Pan Waterproofing Mistakes to Avoid
- When to Call a Professional for Shower Pan Waterproofing
- Getting Shower Pan Waterproofing Right the First Time
- Shower Pan Waterproofing: Common Questions
- Do I need to waterproof the walls as well as the floor?
- How thick should the mortar bed be under a shower pan liner?
- What is the difference between a 30 mil and 40 mil PVC pan liner?
- Can I install a Schluter Kerdi membrane myself?
- How long does a shower pan liner last?
- Does shower pan waterproofing need a building permit?
What Shower Pan Waterproofing Actually Does
Tile and grout are not waterproof. Grout is porous by nature, essentially fine sand bound together with Portland cement. Water moves through grout joints constantly during every shower. That’s expected. The waterproofing system below the tile catches that water and directs it to the drain before it can reach anything it can damage.
A properly built shower pan works in two stages. First, a sloped mortar base guides water toward the drain. Second, a waterproof membrane sits either under that mortar base (traditional method) or directly under the tile (bonded membrane method). Both approaches work. Which one you use depends on budget, skill level, and the shower design.
The weakest points in any shower are the seams, the corners, the area around the drain, and the junction of the curb and door jamb. Every method of shower pan waterproofing has to address all four of those spots specifically. Miss one, and water finds it.
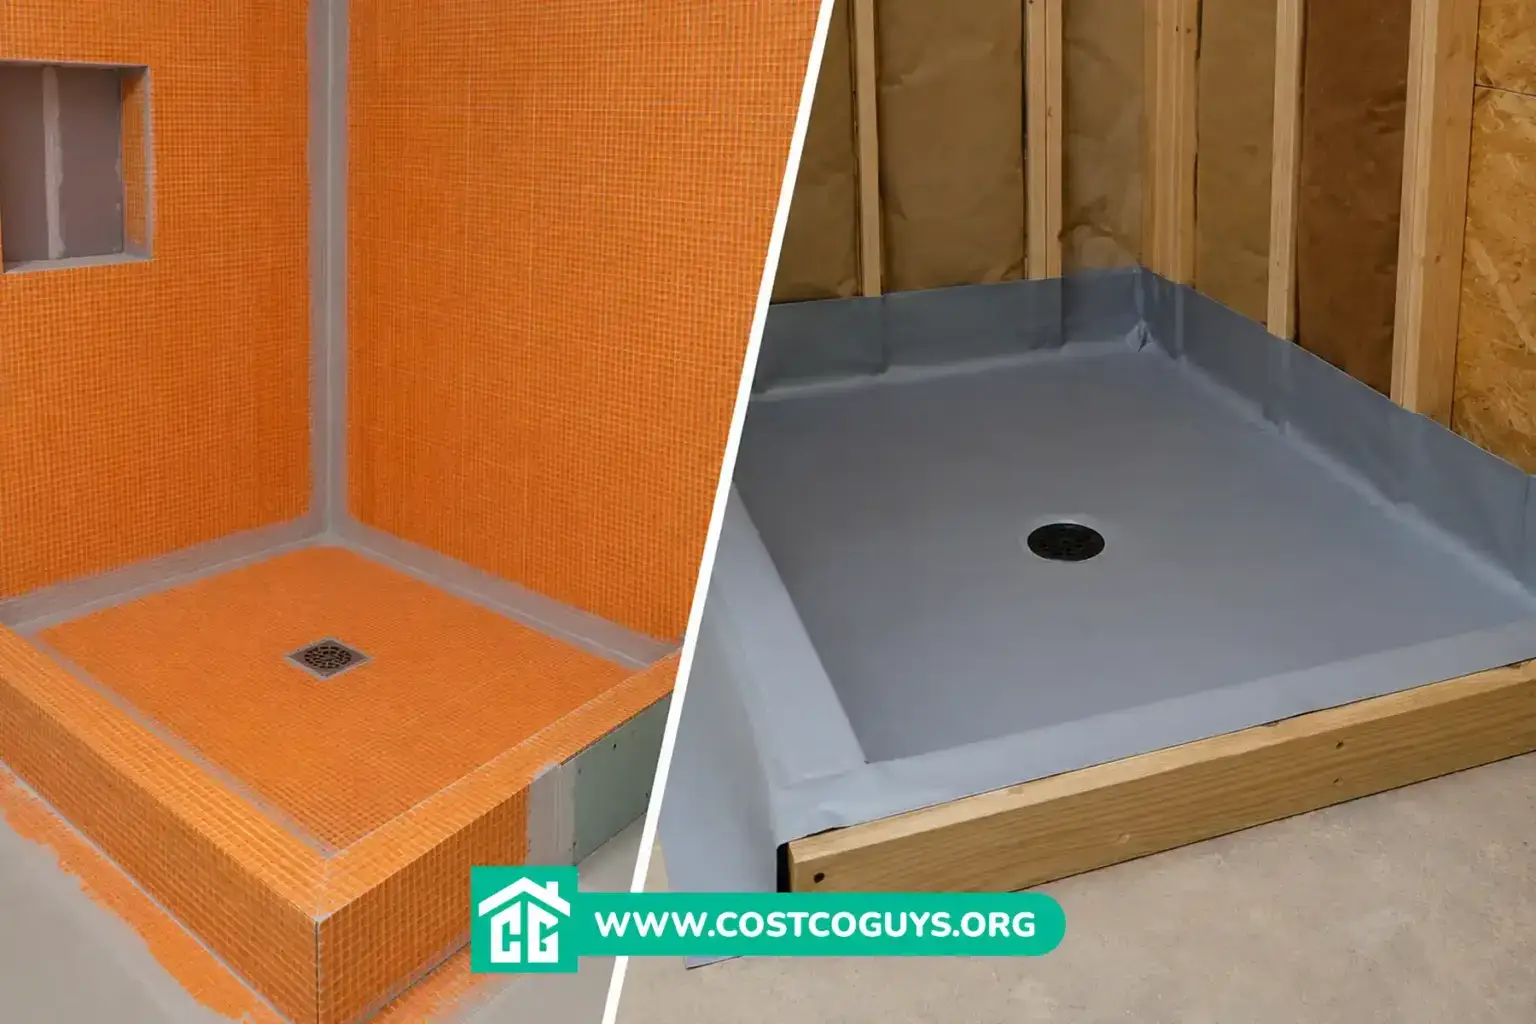
The Three Main Shower Pan Waterproofing Systems
Traditional PVC or CPE Pan Liner
The pan liner method is the older approach, and it’s still widely used. A sheet of flexible PVC or CPE (chlorinated polyethylene) plastic is sandwiched between two mortar beds. The bottom mortar bed is pre-sloped at 1/4 inch per foot toward the drain. The liner sits on top of that slope. A second mortar bed goes over the liner to give the tile something to bond to.
Oatey is the most recognized brand in this category. Their PVC shower pan liner comes in 30 mil and 40 mil thicknesses. The 40 mil version is the better choice for most residential showers because it resists punctures better during the mortar and tile installation. The Oatey PVC shower pan liner kit includes pre-formed corner dams, which seal the junction of the shower curb and door jamb, one of the spots most likely to leak if left unsealed.


One thing to know about this system: the liner is not designed for tile to bond directly to it. The second mortar bed (or “top deck”) on top of the liner is what holds the tile. Never use thin-set mortar directly on the liner itself.
Another critical detail is drain connection. A traditional liner drain uses a clamping ring that sandwiches the liner between the drain body and the clamping ring. The drain weep holes sit above the liner so any water that gets through the top mortar bed can still exit. If those weep holes get clogged with thin-set during installation, water pools in the mortar bed and the system fails slowly over time.
Sheet Membrane Systems (Schluter Kerdi)
Schluter’s Kerdi system takes a different approach. Instead of putting the waterproof barrier below the mortar, Kerdi places it on top of the substrate and directly under the tile. The membrane bonds to the substrate using unmodified thin-set mortar, and tile bonds to the membrane’s outer fleece surface using the same thin-set. There’s no second mortar bed and no traditional pre-slope needed because Schluter makes a pre-formed foam pan (the KERDI-SHOWER-T) with the slope already built in.
The Kerdi drain connects directly to the membrane, forming a continuous waterproof barrier from drain to wall to curb. Water never reaches the substrate or any wood framing. The mortar bed stays dry between uses, which eliminates the wet, saturated mortar condition that causes grout discoloration and mold in traditional systems.
The material cost for a Kerdi system is higher than a traditional PVC liner setup. Professionals and forum communities like the John Bridge tile forums have historically noted that a complete Kerdi shower costs roughly $250 to $300 more in materials than a traditional cement board and PVC liner build for a standard 3×5 shower. The labor is often faster because you skip the pre-slope and the two-mortar-bed process.
Liquid-Applied Waterproof Membranes
Products like Laticrete Hydro Ban and RedGard are applied with a roller or brush directly onto cement board or existing substrates. They cure to form a flexible, bonded waterproof layer. Tile goes directly on top once the product dries, usually after two coats.
Liquid membranes are popular on walls and for simpler shower floor applications because they’re faster to apply. The downside is that thickness is harder to control. Thin spots create weak points, particularly in corners and around the drain. Professional tile setters who use Kerdi or PVC liner systems regularly note that liquid membranes require precise application to perform consistently, which makes them a slightly higher-risk DIY option on the floor.
Shower Pan Waterproofing: Step-by-Step for the PVC Liner Method
This is the most common DIY approach and the one most plumbing supply stores stock fully. Here’s how the process runs from subfloor to ready-for-tile.
Prepare the subfloor:
The subfloor must be clean, dry, and structurally sound. Any soft spots or movement will crack the mortar bed and eventually the liner. Fix any squeaks or deflection before you start.
Install the drain base:
Set the bottom drain body at the correct height so the finished shower floor sits flush. The drain should be positioned so it gets the pre-slope mortar at the right thickness.
Pour the pre-slope mortar bed:
Mix a deck mud (dry-pack mortar of Portland cement and sand) and pack it at 1/4 inch per foot from the walls down to the drain. This is the sloped surface the liner will sit on. The mortar bed thickness typically runs 2 to 3 inches at the drain and increases toward the walls. Let it cure per the mortar manufacturer’s instructions.
Cut and lay the PVC liner:
Measure the shower floor and walls carefully. The liner needs to extend at least 3 inches above the finished curb height on all sides. Cut the liner to size, fold the corners, and bond the folded corners with Oatey X-15 bonding adhesive for PVC liners (Oateyweld for CPE liners). Staple the liner only to wall framing above the curb height. Never staple below the curb line because staples penetrate the liner below the waterproof zone.
Install the curb liner pieces:
Cut separate liner pieces to wrap the shower curb. The total width equals the inside curb height plus the outside curb height plus the top curb width. Adhere these to the curb with bonding adhesive and staple to the outside of the curb.
Clamp the liner to the drain:
Remove the clamping ring from the drain body, position the liner over the drain, and cut a precise hole slightly smaller than the drain opening. Bolt the clamping ring down evenly, compressing the liner against the drain body for a watertight seal. The weep holes must stay clear.
Flood test the liner:
Plug the drain and fill the pan with 2 inches of water. Leave it 24 hours. Any drop in water level means you have a leak. Find and fix it before continuing.
Pour the top mortar bed:
This bed goes over the liner and provides the surface for tile. It needs to slope to the drain as well, matching the pre-slope below. Pack the mortar carefully around the drain clamping ring so the weep holes remain open.
Install cement board on walls:
Cement board (such as Hardiebacker) attaches to wall studs with screws. Keep the bottom edge of the board 1/8 to 1/4 inch above the liner surface so it doesn’t wick moisture. Tape seams with fiberglass mesh and apply a waterproof membrane over the cement board in wet areas, or use a liquid membrane over the board surface before tiling.
Set tile using wet-area thin-set:
Use thin-set rated for wet areas. Press tile firmly to ensure full coverage on the back. Grout once tile is cured, and seal the grout-to-wall and floor-to-wall transitions with 100% silicone caulk, not grout. Caulk allows for movement; grout cracks.
Shower Waterproofing Cost Breakdown for 2026
| Item / Service | Typical Cost Range | What Affects the Price |
|---|---|---|
| PVC or CPE pan liner (materials only) | $40 to $120 | Thickness (30 vs 40 mil), size, kit vs. roll |
| Pre-slope and top mortar bed (materials) | $30 to $80 | Shower size, number of bags needed |
| Schluter Kerdi sheet membrane (materials) | $150 to $350 | Roll size, whether you buy the system kit or individual pieces |
| Liquid membrane (RedGard, Hydro Ban) | $40 to $100 per gallon | Coverage area, number of coats required |
| Cement board (walls and floor) | $1.50 to $3.50 per sq ft | Brand, thickness (1/4 in vs 1/2 in), sheet size |
| Drain (traditional clamping or Kerdi drain) | $30 to $180 | Material (ABS vs stainless), type (clamp ring vs Kerdi) |
| Labor for waterproofing only | $350 to $700 | Method, market, complexity, shower size |
| Full tile shower pan installed (materials + labor) | $900 to $2,300 | Shower size, method, local labor rates, permit requirements |
| Water damage repair if liner fails | $5,000 to $15,000+ | Extent of damage, mold remediation, structural repair needed |
Waterproofing materials themselves are a small part of a full shower budget, often under 10% of total renovation cost. The cost of getting it wrong is dramatically higher. Angi’s 2026 data puts average shower pan replacement at $900 to $2,300, with the low end covering a simple prefab pan swap and the high end covering a full custom tile pan with labor.
How These Cost Estimates Were Developed
The ranges above reflect editorial review of publicly available pricing from Angi, manufacturer product pages (Oatey, Schluter), and general contractor pricing data current as of mid-2026. They are not official quotes, guaranteed local rates, or audited figures. Regional labor rates vary significantly. Plumbers in high-cost metros charge more than contractors in smaller markets. Material costs also shift with supply chain conditions.
Where Angi’s 2026 cost data and ProLux Materials’ 2025 estimates overlapped, the ranges were used as published rather than averaged into a single invented number. For the waterproofing-only portion (materials plus labor for the liner or membrane), current estimates put the typical range at $350 to $1,000 depending on system and shower size. That aligns with what tile contractors report in professional trade forums for standard 3×5 showers.
Always get at least two local quotes before budgeting. Your final cost depends on local permit requirements, the existing subfloor condition, and whether any framing or drain relocation is needed.
PVC Liner vs. Schluter Kerdi: Which One Makes Sense
Both systems work when installed correctly. The decision usually comes down to skill level and project type.
The traditional PVC liner with mortar beds has been standard for decades. It’s cheaper in materials, widely understood by most tile setters, and the components are available at any plumbing supply store. The trade-off is complexity. Pouring two mortar beds with a proper slope takes skill. Folding liner corners without creasing or puncturing the material is harder than it looks. And if the weep holes clog, the mortar bed stays permanently wet.
Schluter Kerdi costs more upfront in materials but simplifies the installation considerably. The pre-formed foam pan handles the slope. The membrane applies in one step. There’s no wet mortar bed to stay saturated between showers. Schluter also offers full system compatibility, meaning the drain, membrane, corners, and curb pieces all work together as a designed unit. Their technical support line is active and specific. For a confident DIYer doing a first tile shower, Kerdi is generally easier to execute correctly the first time.
Liquid membranes like RedGard or Hydro Ban sit below both in material cost and work well on walls. On the floor, they’re better suited to experienced installers who can consistently control application thickness. They’re a reasonable budget option for simpler shower designs without complex corners or multiple curbs.
Common Shower Pan Waterproofing Mistakes to Avoid
Skipping the pre-slope is the most common error in traditional liner installations. If the liner sits flat on the subfloor rather than on a sloped mortar base, water collects in the mortar above the liner instead of draining through the weep holes. The mortar bed stays wet, grout discolors, and mold develops inside the wall where you can’t see it.
Nailing or screwing through the liner below the curb line creates penetrations that leak. Staples belong only on the wall framing above the finished curb height. Everything below that line needs to stay unpenetrated.
Blocking the drain weep holes with thin-set is another frequent problem. When you pour the top mortar bed, it’s easy to press mortar into the weep holes around the drain body. Use small pieces of foam or tape to keep the holes clear during the mortar pour, then remove them before flood testing.
Using grout instead of silicone caulk at the floor-to-wall transition is a mistake that shows up fast. The floor and walls move slightly relative to each other as the house settles. Grout cracks at that joint. Silicone caulk flexes and stays sealed. Match the caulk color to your grout for a clean look.
Mixing membrane systems from different manufacturers without confirming compatibility is also risky. Schluter’s KERDI membrane is designed to bond with the fleece surface using unmodified thin-set. Mixing it with a liquid membrane system from a different brand at the floor-to-wall transition can leave a gap that neither system seals as intended. Stick to one system per shower.
When to Call a Professional for Shower Pan Waterproofing
DIY shower pan waterproofing is realistic for someone comfortable with mortar work, basic plumbing, and tile setting. If you haven’t worked with deck mud before, pouring a pre-slope to a consistent 1/4 inch per foot is harder than tutorials make it look. One bad slope means standing water, which means failure.
Call a licensed tile setter or plumber if any of the following apply: the subfloor has soft spots or rot from a previous leak; the shower design includes multiple curbs, a curbless threshold, or a linear drain; you’re building a steam shower (which requires full floor-to-ceiling waterproofing, not just the pan); or you’re working over a concrete slab that may need jackhammering for drain relocation.
A professional waterproofing installation also matters for warranty purposes. Some shower system manufacturers (including Schluter) offer material warranties but may condition them on proper installation. A failed liner that causes subfloor damage creates a repair scenario where proving correct original installation matters. Document your work with photos during the flood test regardless of whether you go DIY or hire out.
Getting Shower Pan Waterproofing Right the First Time
The material cost difference between doing shower pan waterproofing correctly and cutting corners is often less than $100. The cost of tearing out a failed shower, replacing rotted subfloor and framing, and remediating mold typically starts at $5,000 and goes much higher if the damage has spread.
For most homeowners tackling a tile shower for the first time, the Schluter Kerdi system is more forgiving than a traditional PVC liner setup. It costs more in materials but removes the most technically difficult steps. If you prefer the traditional approach, the Oatey PVC shower pan liner kit with pre-formed corner dams covers the high-risk spots well. Either way, flood test the liner before you pour the top mortar bed. That test takes 24 hours and has saved countless tile jobs from having to come out months later.
Shower Pan Waterproofing: Common Questions
Do I need to waterproof the walls as well as the floor?
Yes. Water from the showerhead hits the walls directly, and grout on tile walls is just as porous as grout on the floor. At minimum, apply a waterproof membrane or use a waterproof substrate like cement board with a liquid membrane on the surface. The most vulnerable wall area is the top edge of the tile where it meets the dry wall above the wet zone. Seal that transition carefully with silicone caulk or a compatible membrane overlap.
How thick should the mortar bed be under a shower pan liner?
The pre-slope mortar bed should be 2 to 3 inches thick at the drain, sloping upward at 1/4 inch per foot toward the walls. The top mortar bed above the liner follows the same slope. Thinner pours are possible with higher-strength cement mixes, but going thinner than about 3/4 inch on the top bed risks cracking under foot traffic.
What is the difference between a 30 mil and 40 mil PVC pan liner?
Thickness, measured in thousandths of an inch. A 40 mil liner (0.040 inches) resists punctures from staples, mortar aggregate, and dropped tools better than a 30 mil sheet. For residential tile showers, the 40 mil version is worth the small added cost. The 30 mil liner is more appropriate for lighter-duty or less complex applications.
Can I install a Schluter Kerdi membrane myself?
Yes, and many homeowners do. The system is designed with DIY users in mind. The main requirements are using unmodified thin-set (not modified), maintaining full coverage behind the membrane without air pockets, and using compatible Kerdi accessories for corners and the drain. Schluter’s website and YouTube channel have detailed installation videos. Their technical support line is also open for installation questions during the project.
How long does a shower pan liner last?
A correctly installed PVC or CPE liner should last 20 years or longer. Failure usually comes from installation errors rather than material age, specifically missed pre-slopes, penetrations below the curb, or clogged weep holes. Schluter Kerdi membrane systems are rated similarly, with many installations lasting 25 years or more in residential use.
Does shower pan waterproofing need a building permit?
It depends on your jurisdiction and the scope of work. A full shower rebuild generally requires a permit in most municipalities, especially if plumbing is being moved or replaced. Waterproofing-only work as part of a tile replacement may or may not require a permit locally. Check with your local building department before starting. Unpermitted work can complicate home sales and insurance claims if water damage occurs later.