
Shower pan construction costs most homeowners between $600 and $2,500 for a DIY build using a mortar bed and liner, or up to $3,500 if you hire a tile contractor in 2026. The price depends on whether you build a traditional mud-set pan, install a prefabricated base, or use a foam shower system with built-in slope. Materials, drain type, and shower floor size all push the number up or down.
- What Shower Pan Construction Actually Involves
- Types of Shower Pans You Can Build or Buy
- Traditional mortar bed (mud-set) pan:
- Prefabricated foam shower pan:
- Acrylic or fiberglass shower base:
- Step-by-Step: Building a Mortar Bed Shower Pan
- Setting the Drain and Pre-Slope
- Installing the Waterproofing Liner
- Building the Final Mortar Bed and Tiling
- Waterproofing Membranes: Liner vs Sheet vs Liquid
- Common Shower Pan Construction Mistakes
- Skipping the pre-slope layer:
- Cutting or puncturing the liner at corners:
- Not curing mortar long enough:
- Using the wrong drain for the liner type:
- Ignoring the curb height and slope at corners:
- Shower Pan Construction Cost Breakdown
- How These Cost Estimates Were Calculated
- DIY Mortar Bed vs Prefabricated Foam Pan
- When to Hire a Professional for Shower Pan Installation
- Getting Your Shower Pan Construction Right the First Time
- Shower Pan Construction FAQs
What Shower Pan Construction Actually Involves
Shower pan construction means building the sloped, waterproof floor under your shower tile. It’s not just the visible tile floor. It’s a system of layers working together: a subfloor, a mortar bed or foam base, a waterproofing membrane or liner, and finally the tile or stone finish on top.
The whole point is to direct water toward the drain instead of letting it sit or seep into the subfloor below. A properly built shower pan creates a watertight barrier even if water gets through the grout lines, which it eventually will on any tiled shower floor.
Most homeowners confuse “shower base” with “shower pan.” A shower base usually refers to a one-piece acrylic or fiberglass unit you drop in. A shower pan, in trade terms, is the built-up system you construct on site, layer by layer, then tile over.
Types of Shower Pans You Can Build or Buy
You’ve got three real options for shower pan construction, and each one fits a different skill level and budget.
Traditional mortar bed (mud-set) pan:
A sand-and-cement mix packed and sloped by hand, topped with a waterproofing membrane, then tile. This is the most labor-intensive method but gives you full control over size and shape.


Prefabricated foam shower pan:
Pre-sloped foam boards (like those from Schluter or Wedi) come ready to set on the subfloor. You glue them down with thinset mortar and waterproof the seams. Much faster than mud-set.
Acrylic or fiberglass shower base:
A molded one-piece unit you drop into the framed opening. No tile work needed, but you’re locked into stock sizes.For tiled showers specifically, the mortar bed and foam pan are the two real choices. The acrylic base skips tile entirely, so it’s a separate category if you want a seamless look without grout.
Step-by-Step: Building a Mortar Bed Shower Pan
This is the method most tile setters still use, and it holds up well when done correctly.
Setting the Drain and Pre-Slope
Start by installing the drain assembly, which connects your shower floor to the plumbing below. You’ll need a two-piece clamping drain that lets the liner seal against the lower flange. Pack a thin pre-slope layer of dry-pack mortar under where the liner will sit, sloping it about a quarter inch per foot toward the drain. This pre-slope keeps water moving even if some seeps under the liner.
Installing the Waterproofing Liner
A pan liner is a critical layer, usually a sheet of CPE or PVC vinyl, that catches any water that gets past the tile and grout above it. Cut the liner to size, fold it neatly into the corners without cutting through at the seams, and clamp it to the drain’s lower flange. Run the liner up the walls at least a few inches above where the finished shower floor will sit.
Building the Final Mortar Bed and Tiling
On top of the liner, pack a second mortar bed, again sloped toward the drain, this time as your tile substrate. Let it cure for at least 24 to 48 hours before tiling. Use thinset adhesive to set your tile or stone, then grout the joints once the thinset has cured.
Waterproofing Membranes: Liner vs Sheet vs Liquid
You’ve got three main waterproofing approaches for shower pan construction, and picking the right one matters more than people think.
A CPE or PVC pan liner is the traditional choice, used only at the pan level under a second mortar bed. Sheet membranes, like Schluter-Kerdi, waterproof the entire shower (walls and floor) in one continuous layer, which reduces seams and leak points. Liquid-applied membranes, painted or rolled on, work well for irregular shapes but need multiple coats and full drying time between each.
Sheet membranes have become the more popular choice for new shower pan construction since they waterproof above the mortar bed instead of under it, so you can tile directly onto a thinner system. Many tile contractors prefer this method because it cuts a full mortar bed layer out of the process.
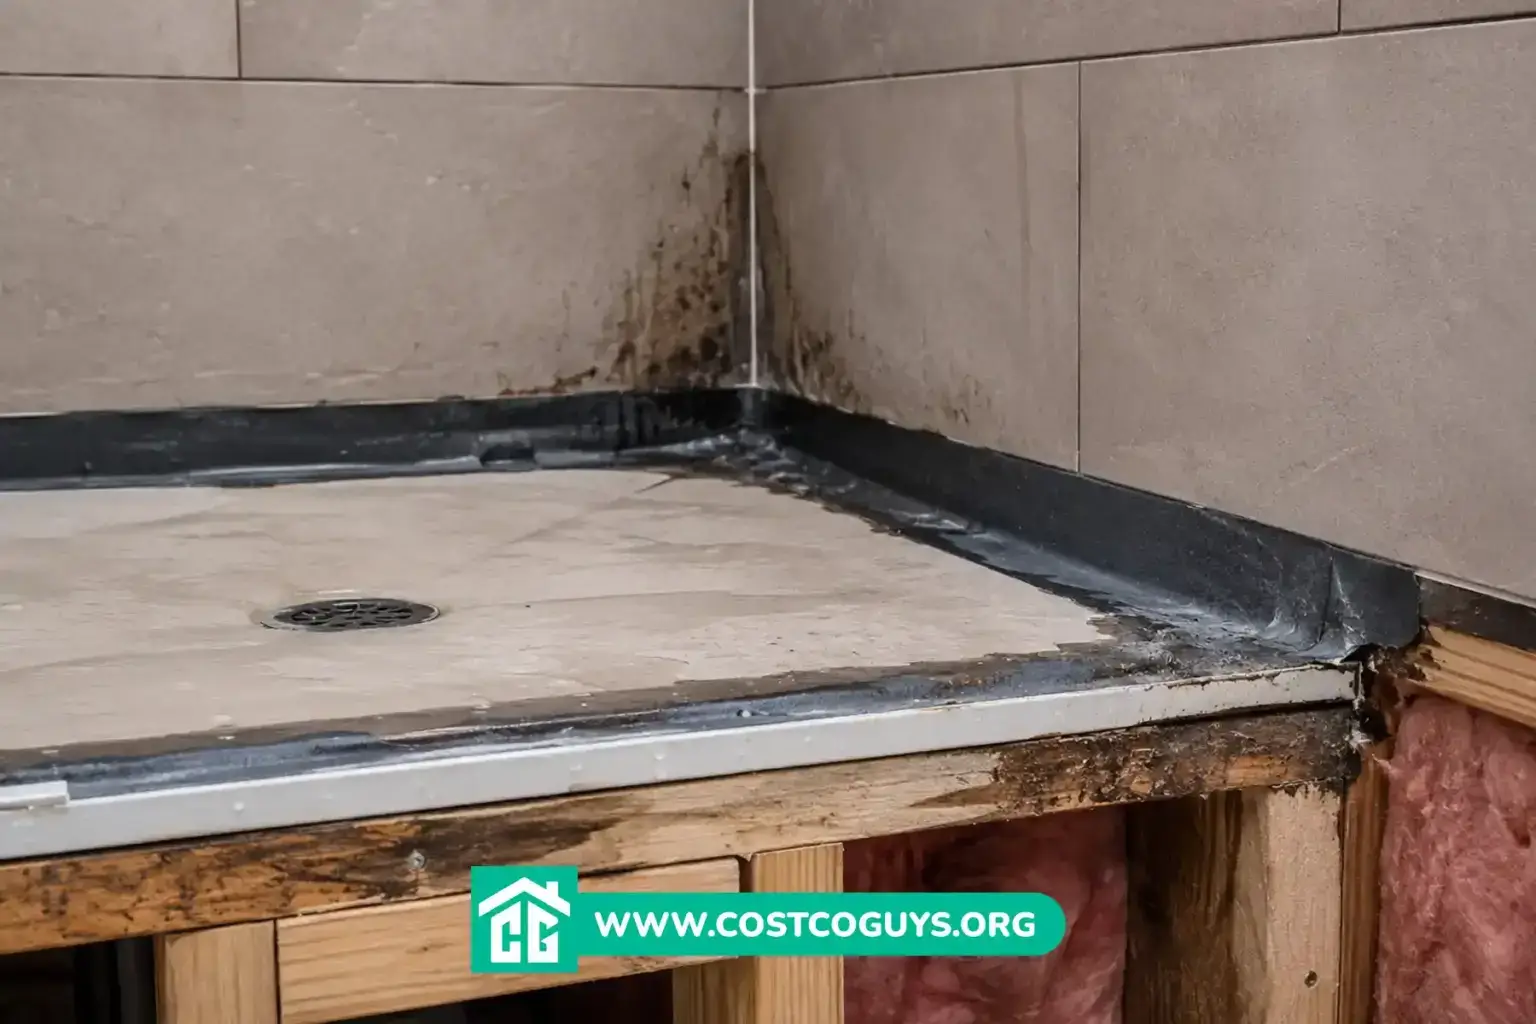
Common Shower Pan Construction Mistakes
A few mistakes show up again and again in failed shower pans, and most of them come from rushing the process.
Skipping the pre-slope layer:
Without it, water sits flat under the liner instead of draining, which leads to standing water and eventually mold.
Cutting or puncturing the liner at corners:
Folding corners incorrectly creates a weak point where water can seep through immediately.
Not curing mortar long enough:
Tiling too soon on a fresh mortar bed can crack the substrate under foot traffic later.
Using the wrong drain for the liner type:
A bonding flange drain won’t seal correctly with a loose-lay liner, and vice versa.
Ignoring the curb height and slope at corners:
Inadequate pitch at the corners is where most leaks start, since water pools there longer than anywhere else on the floor.
Attention to detail at the corners and drain connection matters more than anywhere else in the build. That’s where 90 percent of real-world shower leaks actually start.
Shower Pan Construction Cost Breakdown
| Item/Service | Typical Cost Range (2026) | What Affects the Price |
|---|---|---|
| Mortar bed materials (sand, cement, liner) | $80-$200 | Shower floor size, liner brand |
| Prefabricated foam shower pan kit | $150-$450 | Size, brand (Schluter, Wedi, Laticrete) |
| Drain assembly | $30-$120 | Material (PVC vs brass), linear vs point drain |
| Tile and grout | $200-$1,200 | Tile material, stone vs ceramic, size of shower floor |
| Professional installation labor | $1,500-$3,500 | Local labor rates, project complexity, custom shapes |
DIY shower pan construction typically costs $600 to $2,500 total, mostly tile and materials. Hiring a licensed tile contractor usually runs the full project to $2,000-$3,500, depending on your region and shower size.
How These Cost Estimates Were Calculated
These ranges come from comparing current material pricing at major suppliers like Home Depot, Lowe’s, and tile distributor sites, alongside typical labor quotes reported by tile contractors in 2025 and 2026. Labor rates vary widely by region, often 30 to 50 percent higher in coastal cities than in the Midwest.
This is a typical-range estimate based on informed editorial judgment, not an official or audited figure. Your actual cost depends on your shower size, drain type, tile choice, and local labor rates, so treat this table as a planning tool rather than a quote.
DIY Mortar Bed vs Prefabricated Foam Pan
A mortar bed pan gives you full custom sizing and a proven track record going back decades, but it takes a full weekend of work and some skill with packing and sloping mortar correctly. A foam shower pan installs in a few hours, comes pre-sloped from the factory, and reduces the chance of a sloppy pitch mistake.
For a first-time DIY project, the foam system is usually the safer bet. The mortar bed method rewards experience, and a poorly packed slope is one of the most common reasons shower pans fail within the first few years.
When to Hire a Professional for Shower Pan Installation
Call a licensed contractor if your shower floor has an unusual shape, a curb-less entry, or if you’re tying into existing plumbing that needs modification. Structural issues, like a subfloor that’s not level or has water damage, also call for professional eyes before you build anything on top of it.
Always check local codes before starting, since some municipalities require a flood test or inspection before you can tile over a new shower pan. This is the one disclaimer worth remembering, since skipping it can mean redoing the entire floor if an inspector fails it later.
Getting Your Shower Pan Construction Right the First Time
Shower pan construction comes down to three things done correctly: proper slope toward the drain, a continuous waterproofing layer with no gaps at corners or seams, and enough cure time before you tile. Whether you choose a mortar bed or a prefabricated foam system, skipping any one of those steps is what turns a $1,000 project into a $3,000 repair down the road.
Shower Pan Construction FAQs
How thick should a shower pan mortar bed be?
The pre-slope layer is usually about an inch thick at the drain, and the top mortar bed runs 1.25 to 2 inches thick depending on the slope needed across the floor.
Can I tile directly over a foam shower pan?
Yes, most foam shower pans are designed for direct tile installation using thinset adhesive, as long as you waterproof the seams first with the manufacturer’s recommended tape or coating.
How long does a mortar bed need to dry before tiling?
Most contractors wait at least 24 to 48 hours before tiling over a fresh mortar bed, though full cure can take up to a week depending on humidity and mix.
What’s the best shower pan liner material?
CPE (chlorinated polyethylene) liners are the industry standard for mortar bed pans because they’re flexible, durable, and resist tearing during installation better than PVC alternatives.
Why does my shower floor feel spongy after a few years?
A spongy feel usually means water got past the waterproofing layer and softened the mortar bed or subfloor underneath, which often means a full pan rebuild.