

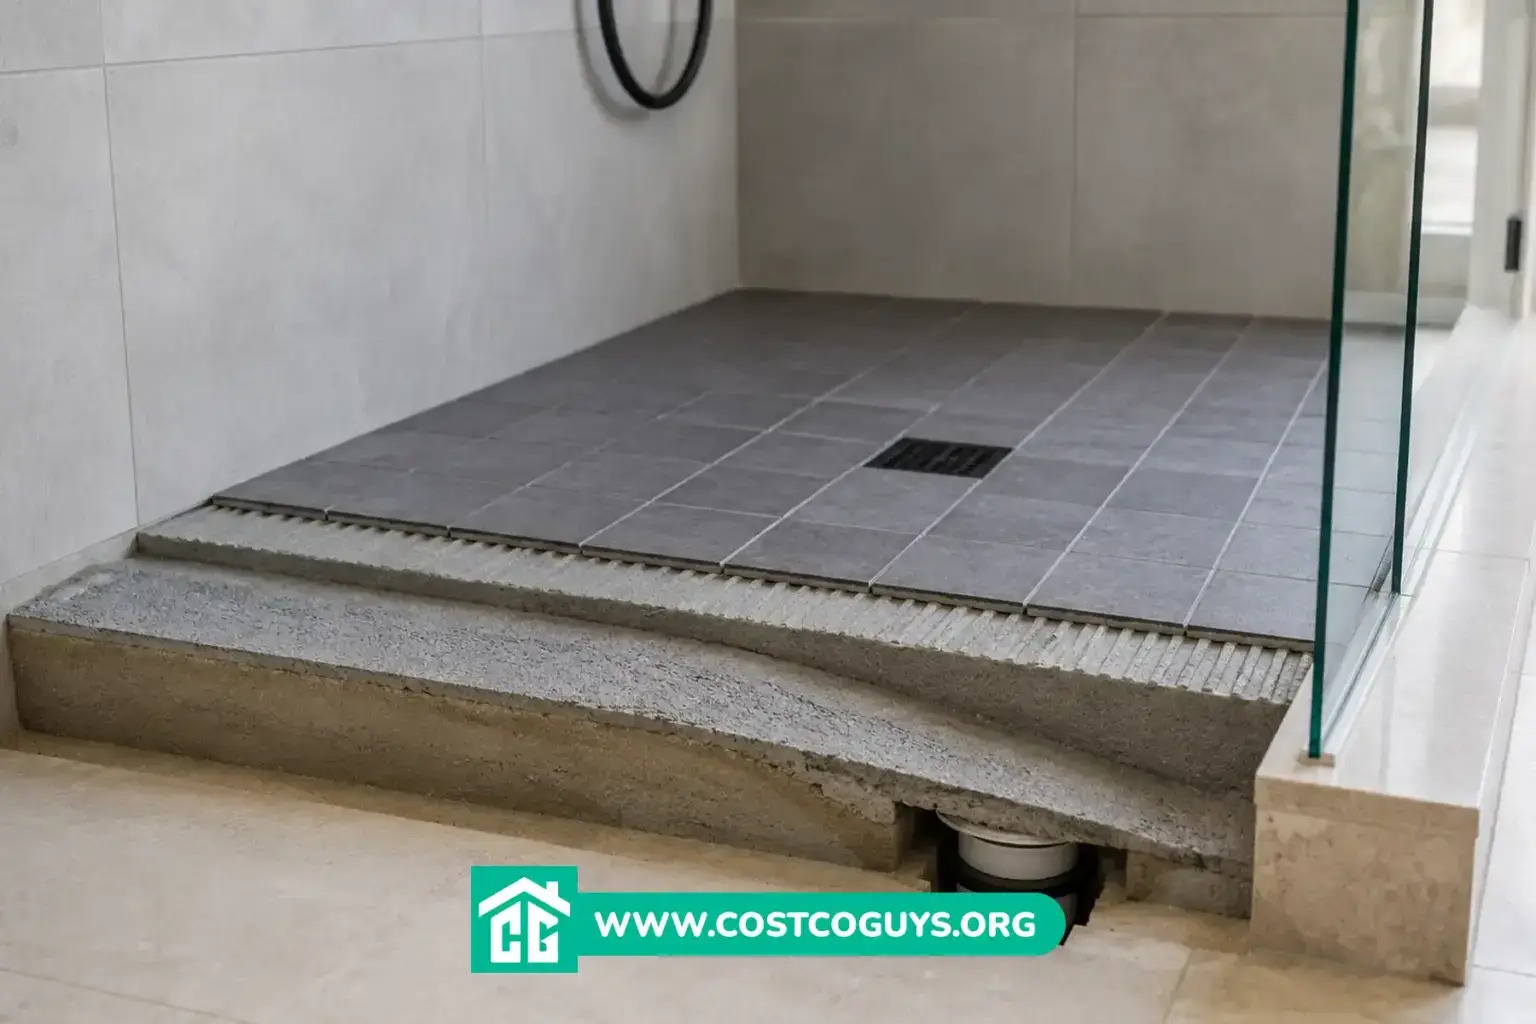

A walk in shower floor slope needs a minimum pitch of 1/4 inch per foot, or about 2 percent, toward the drain. That’s the baseline set by the International Plumbing Code and echoed in the TCNA Handbook, the reference most tile setters use on the job. Most pros stay between 1/4 inch and 3/8 inch per foot in 2026, since anything steeper starts to feel unstable underfoot.
- Minimum and Maximum Slope Requirements
- How to Calculate Your Shower Floor Drop
- Building the Slope: Pre-Slope and Mortar Bed
- Pre-Sloped Pans and Foam Shower Bases
- Waterproofing Membrane and Slope Interaction
- Walk In Shower Floor Slope Cost Breakdown
- How These Cost Estimates Were Reached
- Common Mistakes That Ruin a Shower Slope
- DIY Mortar Bed vs Prefab Pan: Which Fits Your Project
- When to Call a Licensed Plumber or Tile Contractor
- Getting the Walk In Shower Floor Slope Right
- Frequently Asked Questions
Minimum and Maximum Slope Requirements
The International Residential Code sets the floor slope at not less than 1/4 inch per foot and not more than 1/2 inch per foot. That’s a 2 percent minimum and a 4 percent maximum, and both the International Plumbing Code and Uniform Plumbing Code use the same range. An inspector checking your shower will run a water test, so hitting the number on paper isn’t enough. The water actually has to move.
Go below 1/4 inch per foot and water sits in low spots instead of draining. Surface tension holds it there until the puddle evaporates or someone tracks it into the grout lines. Go above 1/2 inch per foot and the floor gets slippery, plus tile setters start fighting lippage, which is when tile edges sit at slightly different heights and catch a bare foot.
Accessible showers built to ADA standards follow a different rule for the entry area. A roll-in shower uses a 1:48 ratio, which works out to no more than 1/4 inch of cross-slope per foot near the threshold. That’s a separate spec from the drainage pitch inside the shower itself, and the two shouldn’t get mixed up during layout.
How to Calculate Your Shower Floor Drop
Measure the distance from the drain to the farthest corner of the shower floor, in inches. Divide that number by 12 to convert it to feet, then multiply by 0.25 to get your total drop in inches. A 3 foot shower needs about 3/4 inch of total drop. A 4 foot shower needs close to 1 inch.
Center drains complicate the math because the floor has to slope in four directions at once. Picture a shallow pyramid turned upside down, with the drain at the low point and the walls forming the high perimeter. On a square shower, the slope measured on the diagonal toward a corner ends up gentler than the slope measured straight toward a wall, since the diagonal distance is longer. Most installers just hold the wall-facing slope at 1/4 inch per foot and let the diagonal work itself out.


Linear drains skip that problem entirely. The floor only needs to pitch in one direction, from the far wall down to the drain channel, which usually sits along one edge. That single-direction slope is why linear drains dominate curbless and walk-in designs where a barrier-free entrance matters.
Building the Slope: Pre-Slope and Mortar Bed
A traditional tiled shower floor uses two separate sloped layers, and skipping either one is how leaks start. The first layer is the pre-slope, a dry-pack mortar bed poured directly on the subfloor. It sits under the waterproofing liner and channels any water that gets past the tile toward small weep holes at the drain base.
The second layer is the finished mortar bed, poured on top of the liner at the same slope. This is what the tile actually bonds to. Both layers use a sand and Portland cement mix, sometimes called deck mud, mixed dry enough to hold its shape when packed and screeded.
Setting the pitch starts with a level line marked around the shower walls at the height of the finished floor’s highest point, usually at the perimeter. From there, an installer uses a straight screed board, resting one end on that level mark and the other on the drain flange, and drags it across the wet mortar to scrape away the excess. Repeat that from every direction and you get a consistent slope that meets the wall line evenly on all sides.
Weep holes at the drain base need to stay open during this process. Cover them with mortar by accident and water trapped under the tile has nowhere to go, which turns the whole mortar bed into a hidden reservoir.
Pre-Sloped Pans and Foam Shower Bases
Not every walk in shower floor slope gets hand-built. Foam shower bases and pre-sloped pans come from the factory with the pitch already molded in, usually at the code-minimum 1/4 inch per foot. Systems like Schluter Kerdi-Shower or similar EPS foam trays let a tile setter skip the mortar bed entirely and go straight to waterproofing and tile.
These trays need a subfloor that’s flat and level before installation, since the tray itself provides the pitch rather than correcting for an uneven floor underneath. They also come pre-integrated with drain locations, so relocating a drain on a foam base usually means buying a different model rather than cutting and shaping mortar on site.
Kits that bundle the tray, membrane, drain, and pre-formed corners into one package have become more common through 2026, largely because they cut install time from a multi-day mortar cure down to a single afternoon. The tradeoff is less flexibility on unusual shower shapes or oversized tile that needs a firmer substrate.
Waterproofing Membrane and Slope Interaction
The slope only works if the waterproofing layer underneath follows it exactly. This is where a lot of otherwise decent tile jobs fail. Installers sometimes build a properly sloped mortar bed, then lay a flat membrane over it, or worse, install a flat pre-slope and rely on the finished mortar bed alone to carry the pitch.
Both mistakes create what tile pros call a false slope. The tile surface looks angled and drains fine on the top, but the layer beneath it is flat or has low spots. Water that gets through grout lines, and some always does over time, pools under the tile instead of reaching the drain. Months later that shows up as a musty smell, loose tile, or dark staining at the grout joints.
PVC and CPE sheet liners run about $0.60 to $1.00 per square foot in material cost and wrap the pan before the mortar bed goes on top, forming a catch basin under the tile. Bonded sheet membranes like Schluter Kerdi run closer to $1.20 to $1.80 per square foot and adhere directly to the mortar surface with thinset, which is a cement-based adhesive used to set tile. Liquid-applied membranes such as RedGard or HydroBan cost less, typically $0.50 to $0.80 per square foot, and go on with a roller in two coats. Whichever system you use, the membrane needs to mirror the slope of the surface underneath it, with zero flat spots.
Walk In Shower Floor Slope Cost Breakdown
| Item or Service | Typical Cost Range | What Affects the Price |
|---|---|---|
| Mortar bed pre-slope and finish coat (materials and labor) | $9 to $12 per square foot | Shower size, drain type, local labor rates |
| PVC or CPE liner (material only) | $0.60 to $1.00 per square foot | Liner thickness and brand |
| Sheet membrane system (material only) | $1.20 to $1.80 per square foot | Brand, drain integration kit |
| Liquid-applied membrane (material only) | $0.50 to $0.80 per square foot | Number of coats, coverage rate |
| Pre-sloped foam shower base or pan kit | $150 to $950 | Size, drain style, brand |
| Full custom tile shower floor, installed | $900 to $3,500 | Square footage, tile choice, drain relocation |
Linear drains generally add $150 to $400 in material cost over a standard center drain, which runs closer to $40 to $100. That extra cost buys a simpler single-direction slope and an easier path to a curbless entry.
How These Cost Estimates Were Reached
These ranges come from comparing current 2026 pricing data across several remodeling cost trackers, contractor pricing databases, and manufacturer material listings, then cross-checking the overlap. They reflect national averages rather than a quote for any specific home. Material costs shift with brand and retailer, and labor rates swing by region, sometimes by 20 percent or more between a small town and a major metro area. Treat this table as a planning range, not a bid. A licensed contractor’s written estimate for your specific shower will always be more accurate than any published average.
Common Mistakes That Ruin a Shower Slope
- Relying on self-leveling compound to fix a bad pitch. Self-leveling compound seeks a flat plane, which is the opposite of what a shower floor needs. Fixing a slope means removing material from high spots or building up low spots with mortar, not pouring a leveler over the problem.
- Building a flat pre-slope and expecting the finished mortar bed to carry the pitch alone. Both layers need the same slope, not just the top one.
- Covering weep holes with mortar during the pour. This traps water in the pre-slope layer with no way out.
- Skipping the 4 foot level check before tiling. A quick check across the surface catches low spots while the mortar is still workable, before tile locks everything in place.
- Assuming a prefab pan doesn’t need a flat subfloor. The pan provides the slope, but an uneven subfloor underneath it can rock the tray or crack the tile grid on top.
DIY Mortar Bed vs Prefab Pan: Which Fits Your Project
A hand-built mortar bed gives you full control over shower shape, drain placement, and slope on irregular layouts that a factory pan can’t match. It also supports large-format tile and natural stone better, since the mortar provides a firmer, more uniform substrate. The tradeoff is time: a proper pre-slope needs at least 24 hours to cure before the liner and finish coat go on, stretching a shower floor into a multi-day job.
A prefab foam base or pre-sloped pan collapses that timeline into a single day and removes the guesswork on getting the pitch even. It works best on standard shower dimensions where a manufacturer already makes a matching tray size. The limitation shows up on oversized showers, custom drain placement, or heavy stone tile that needs more support than a foam core provides.
Neither option is better across the board. A small standard-size walk in shower with a center drain usually favors the prefab route for speed. A large custom layout with a linear drain along an unusual wall often needs the flexibility only a mortar bed can give.
When to Call a Licensed Plumber or Tile Contractor
Relocating a drain almost always means opening the subfloor and adjusting the P-trap, which is the curved section of pipe that holds a water seal to block sewer gas. That’s plumbing work, and most jurisdictions require a permit and a licensed plumber for it. Trying to shift a drain without proper venting can cause slow drainage or sewer gas smells that are hard to trace later.
A shower on a second floor or over a finished ceiling below raises the stakes further, since a slope error there means water damage travels straight into the room underneath. Bring in a tile contractor experienced in shower waterproofing if you’re working with a linear drain, a curbless design, or large-format tile over 24 inches, since all three demand tighter slope tolerances than a standard center-drain stall.
Getting the Walk In Shower Floor Slope Right
A code-compliant walk in shower floor slope sits between 1/4 inch and 1/2 inch per foot, with most contractors landing at 1/4 inch as the safe, standard target. Getting the slope right depends on an accurate pre-slope, a waterproofing layer that mirrors that same pitch exactly, and a finished mortar bed or prefab pan that carries the pitch through to the tile surface. Skip any one of those layers and the floor might still look fine for months before a leak shows up behind the tile.
Frequently Asked Questions
What is the minimum slope for a shower floor?
The minimum slope for a shower floor is 1/4 inch per foot, or about a 2 percent gradient, toward the drain. This is the standard set by the International Plumbing Code and matched by the TCNA Handbook used across the tile industry.
Can a shower floor slope be too steep?
Yes. Most codes cap the maximum at 1/2 inch per foot, or a 4 percent gradient. Beyond that, the floor can feel unstable to stand on and tile setters run into more lippage, where tile edges sit unevenly against each other.
Do curbless showers need a different slope than standard showers?
The shower area itself still needs the standard 1/4 inch per foot slope toward the drain. The bathroom floor just outside a curbless entry needs its own gentle slope, often around 1/8 inch per foot, angled away from the shower to keep water from spreading across the room.
How do I fix a shower floor that doesn’t drain properly?
A shallow or uneven slope usually means removing the tile in the affected area and re-pouring the mortar bed at the correct pitch. Self-leveling compound won’t fix this, since it flattens surfaces rather than creating a slope toward the drain.
Does a linear drain need less slope than a center drain?
The pitch requirement stays the same at 1/4 inch per foot minimum. What changes is the direction: a linear drain only needs a single-direction slope, while a center drain requires the floor to pitch from all four sides toward one point.
