


A shower membrane and shower pan work together as one system, and most homeowners pay $600 to $2,500 to waterproof and install a standard tile shower floor in 2026. Custom layouts with a mud bed, a linear drain, or a curbless entry can push that total past $3,500.
- What a Shower Pan and Membrane Do Together
- Types of Shower Pans You Can Choose
- Liquid Waterproofing Membranes vs Sheet Membranes
- How to Install a Tile-Ready Foam Shower Pan
- Confirm the subfloor and drain height
- Set the pan in thin-set
- Seal the drain connection
- Waterproof the corners and seams first
- Apply the membrane across the full surface
- Flood test before you tile
- Let the membrane cure fully
- Shower Pan and Membrane Installation Costs in 2026
- How These Shower Pan Costs Were Calculated
- Common Shower Waterproofing Mistakes That Cause Leaks
- When to Call a Tile Coach or Licensed Contractor
- Foam Pan vs Mud Bed: Which One Should You Pick
What a Shower Pan and Membrane Do Together
The shower pan is the sloped floor of the shower. It carries water toward the drain instead of letting it pool. The membrane is the waterproof layer, either built into the pan or added on top of it, that stops water from soaking into the mortar bed, the subfloor, or the framing below.
Tile itself is not waterproof. Grout lines and thin-set (the cement-based adhesive that bonds tile to the substrate) let moisture pass through over time. Without a membrane, water works its way down into the wood subfloor and can rot joists or grow mold you never see until the ceiling below stains. This is why every shower base, whether foam, mortar, or acrylic, needs a real waterproofing layer under the tile.
Types of Shower Pans You Can Choose
Three shower pan systems cover most tile showers built today. Each one changes your labor cost, skill level required, and long-term reliability.
Foam shower pan (tile-ready)
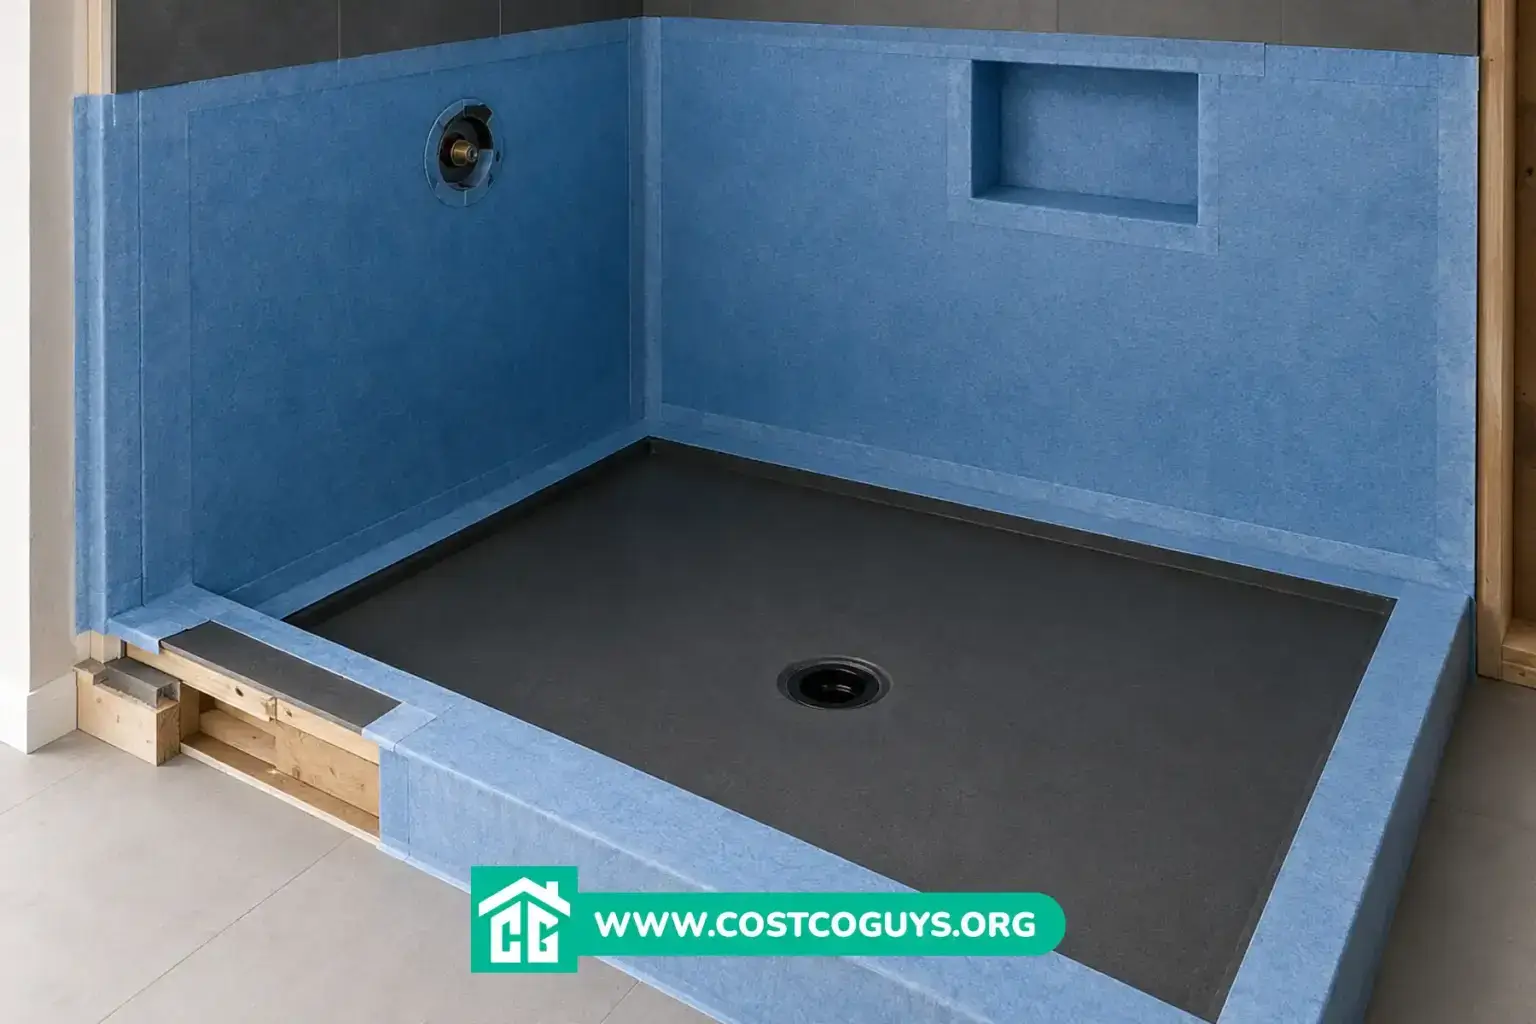
A pre-sloped foam pan, such as a Schluter Kerdi-Shower tray or a Wedi fundo base, ships already sloped to the drain. You set it in thin-set, seal the seams, and tile straight over it. Foam pans cost $250 to $600 for materials and cut installation time compared to a mud bed.
Mortar mud bed
A tile setter builds this shower base by hand from a sand-and-cement mix, sloping it to the drain with a screed guide. A PVC liner or liquid membrane goes either under the mud bed or on top of it, depending on the method. A mud bed built from scratch costs $600 to $1,500 including labor, more if the footprint is custom.
One-piece acrylic or fiberglass pan
This is a pre-formed shower base you tile the walls around but never tile the floor of. It costs the least upfront, $100 to $400 for materials, but limits your design since the pan itself is the finished surface.
Custom tile shower bases, whether foam or mud bed, cost more than a one-piece pan because you are paying for tile, labor, and a membrane system instead of a single molded unit. If your bathroom has an odd-shaped stall, a bench, or a curb built into the design, a custom tile pan is usually the only option that fits.
Liquid Waterproofing Membranes vs Sheet Membranes
Once you pick a pan type, you still need to choose how you waterproof it. The two most common methods for a modern shower are liquid-applied membranes and sheet membranes, and each has a different price point and skill level.
Liquid waterproofing membranes, like RedGard or Laticrete Hydro Ban, come in a bucket and go on with a roller or trowel in two coats. Material runs $0.75 to $1.50 per square foot, and they bond directly to cement board, foam board, or a properly prepared mud bed. Liquid membranes are forgiving for a DIYer because you can build thickness in problem spots and they flex slightly once cured, which helps at corners where a rigid material tends to crack.
Sheet membranes, like Schluter Kerdi, are a thin fabric-reinforced material you bond to the substrate with thin-set. Material costs $1.50 to $2.50 per square foot, more than liquid, but the seams and corners come pre-formed. That takes some guesswork out of the trickiest part of any shower waterproofing job. Labor for either system runs $3 to $6 per square foot of skilled installation time, so a typical 60-square-foot shower runs $700 to $2,000 total for materials and labor combined once you include the pan.
PVC liner systems are the older method, still used under mud beds in many markets. A PVC liner sits below the mortar bed and drains through weep holes in a clamping drain, rather than bonding to the surface like a modern membrane. PVC liners cost less in raw material but demand more skill to fold corners without puncturing the sheet, and repairs mean tearing out the whole mud bed.
How to Install a Tile-Ready Foam Shower Pan
This method covers the most common DIY-friendly approach: a foam shower pan with a liquid or sheet membrane on top. A mud bed with a PVC liner is a different process best left to an experienced tile setter, since a bad fold at the drain is one of the top causes of shower pan failure.
Confirm the subfloor and drain height
The subfloor needs to be flat, structurally sound, and free of squeaks before anything goes down. Dry-fit the pan over the drain to confirm it sits at the right height for your finished tile surface.
Set the pan in thin-set
Spread thin-set (the same cement adhesive used for tile) across the subfloor with a notched trowel, then press the foam pan into it, working out air pockets from the drain outward.
Seal the drain connection
Most tile-ready pans use a bonding flange drain. Apply a bead of waterproofing sealant or a pre-cut membrane collar around the drain body to seal that transition, since this seam sees the most water volume of any point in the shower.
Waterproof the corners and seams first
Apply a pre-formed corner piece or fold a fabric strip into the wall-to-floor and wall-to-wall corners before you coat the flat surfaces. Corners crack more than flat areas because the substrate moves slightly with temperature and humidity.
Apply the membrane across the full surface
Roll on two coats of liquid membrane, letting the first coat cure per the manufacturer’s label before the second, or bond a sheet membrane with thin-set over the entire pan and up the walls to your planned tile height.
Flood test before you tile
Plug the drain and fill the pan with an inch or two of water for 24 hours. Check the ceiling below (if there is one) for any sign of moisture. This single step catches most installation mistakes while they are still cheap to fix.
Let the membrane cure fully
Cure times vary by product, but most liquid membranes need 24 to 72 hours before you can safely walk on them or start setting tile. Rushing this step is a common reason DIY showers fail early.
Shower Pan and Membrane Installation Costs in 2026
| Item or Service | Typical Cost Range | What Affects the Price |
|---|---|---|
| Foam tile-ready shower pan | $250 – $600 (materials) | Pan size, drain type, brand |
| Mortar mud bed (built on-site) | $600 – $1,500 (materials and labor) | Custom shape, labor rate, drain relocation |
| Liquid waterproofing membrane | $0.75 – $1.50 per sq ft (materials) | Number of coats, surface prep needed |
| Sheet membrane (Kerdi-style) | $1.50 – $2.50 per sq ft (materials) | Brand, corner and seam pieces needed |
| Membrane labor (either type) | $3 – $6 per sq ft | Regional labor rates, shower complexity |
| Full standard shower install | $900 – $2,300 (materials and labor) | Pan type, tile choice, drain relocation |
| Custom tile shower base | $900 – $3,500 | Size, bench, curb design, linear drain |
How These Shower Pan Costs Were Calculated
These ranges come from comparing multiple 2026 sources, including national contractor pricing data and manufacturer material pricing from major tile retailers. Where sources disagreed, we used a range rather than a single number. Angi and Homewyse both track similar mid-range totals near $900 to $2,300 for a standard shower pan job, while This Old House cites a wider $220 to $3,500 span that includes both budget prefab kits and full custom builds.
Labor rates for tile setters and plumbers run $45 to $150 per hour depending on region, which is the biggest single factor behind cost swings between cities. This is editorial judgment based on available public pricing data, not an audited figure, and your local quote can land outside these ranges depending on your contractor and market.
Common Shower Waterproofing Mistakes That Cause Leaks
The corner seam is the single most common failure point in a tile shower. A DIYer will often coat the flat pan surface evenly, then rush the inside corners where the wall meets the floor. That thin spot cracks first once the house settles or the substrate flexes.
Skipping the flood test is another costly mistake. It takes one day and costs nothing beyond your time, yet it’s the only way to catch a pinhole leak before you cover it with tile and grout. Once tile is set, a leak can run for months before it shows up as a stain or a soft spot in the ceiling below.
A third mistake is mixing systems that were never designed to work together, like bonding a sheet membrane over a mud bed with the wrong thin-set, or using a liquid membrane rated for interior walls on a shower floor that sees standing water. Manufacturer coverage rates and cure times exist for a reason, and skipping a second coat to save material is a common way corners end up under-protected.
When to Call a Tile Coach or Licensed Contractor
A confident DIYer with tile experience can usually handle a foam pan with a liquid membrane, since the steps are straightforward and forgiving of small mistakes. A mud bed with a PVC liner is a different story. Folding a PVC liner correctly at the corners without puncturing it takes real practice, and a bad fold there can leak for years before anyone notices.
Call a licensed plumber if your project involves moving the drain, since that touches the P-trap (the curved pipe that holds water to block sewer gas) and often requires a permit. Hire a contractor or an experienced tile coach if you’re building a curbless shower, adding a linear drain, or working with natural stone, since stone reacts differently to some liquid membranes than porcelain does. Getting a second set of eyes on your waterproofing before tile goes down is one of the cheapest insurance moves in the entire renovation.
Foam Pan vs Mud Bed: Which One Should You Pick
A foam pan and a mud bed both create a durable shower base when installed correctly, but they suit different projects. Foam pans save installation time and are more forgiving for a DIYer, which is why many contractors default to them for standard rectangular showers. A mud bed still wins when the shower has an unusual footprint, a custom drain location, or a design that a pre-sloped pan simply cannot match.
Cost-wise, foam pans usually come out cheaper once you factor in labor, since a mud bed takes a tile setter longer to build and cure. If budget and speed matter more than a fully custom shape, a foam shower pan is typically the better value.
Do I need both a shower pan and a separate membrane?
Yes, in most cases. A shower pan gives you the sloped surface that carries water to the drain, while the membrane is the waterproof layer that keeps that water from soaking into the substrate. Some foam pans include a bonded top layer, but you still need to waterproof the seams, corners, and drain connection separately.
How long does a shower membrane need to cure before tiling?
Most liquid waterproofing membranes need 24 to 72 hours to cure fully, depending on humidity and the number of coats applied. Sheet membranes bonded with thin-set typically need the thin-set to cure, usually 24 hours, before you start tile installation on top.
Can I install a shower pan and membrane myself?
A foam tile-ready pan with a liquid membrane is a realistic DIY project if you have basic tile experience and follow the flood test step. A traditional mud bed with a PVC liner is harder to get right and is where most DIY shower leaks originate.
What’s the best shower pan for a small bathroom?
A pre-sloped foam pan works well in most small bathrooms because it installs faster and takes up less build height than a mortar mud bed. If your drain sits in a standard center location, a foam pan usually fits without any custom cutting.
Why does my shower pan crack even though I waterproofed it?
Cracks usually trace back to a corner or seam that got a thin, uneven coat of membrane, or a substrate that wasn’t fully cured or secured before waterproofing began. A flood test before tiling catches most of these problems while they’re still easy to fix.
